Portfolio Categories: SAN FRANCISCO CHRONICLE

Using Your Gourds / The humble squash come out of their shells with quick creative touches anybody can do

Not many crafts are quick enough to do in one afternoon, yet look like they’ve been slaved over for weeks. We’ll name one: gourds. But chase those visions of rattles out of your head; gourds offer grownup savvy, too. If you’ve got Martha Stewart-like creative leanings and lead a time-starved real-world life, then gourd crafts are for you.
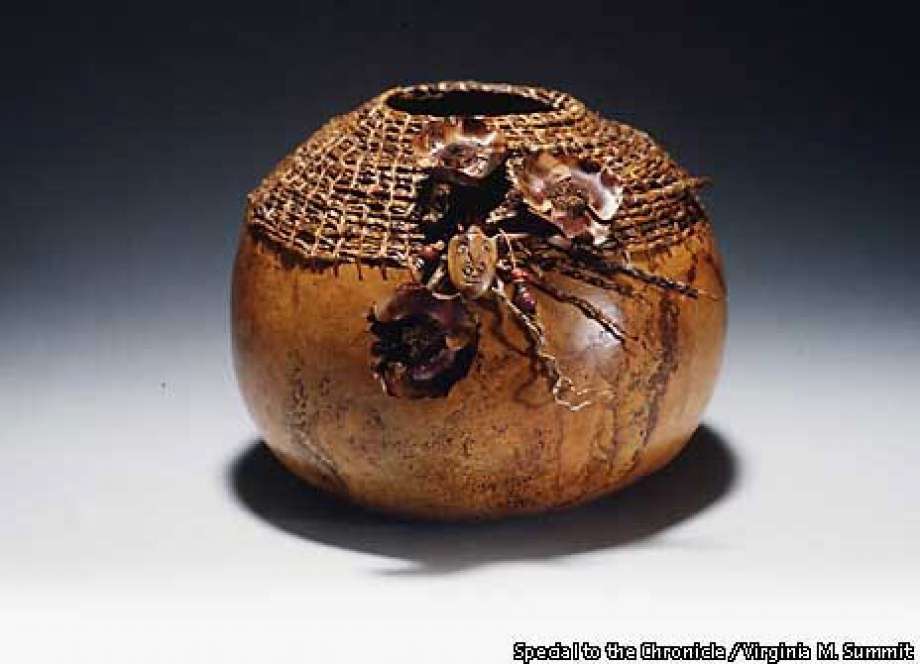
Members of the cucurbitaceae family, which includes melons and squash, gourds are the only ones that dry with a hard shell. You can decorate this shell just about any way you wish — rustically with carving and wood burning, elegantly with metallic paint and beads. Often you need little more than materials you have around the house. No special tools are required. You might opt for simply polishing them to a bright sheen with shoe polish. You can also give gourds another dimension by attaching items such as beads, netting, plant pieces, string and leather.
Anything goes — and anybody of any age. “You don’t have to be an artist to do gourd crafting,” says Ginger Summit, a Los Altos writer of several books on gourds. Her “The Complete Book of Gourd Craft” is in its 10th printing, and “Gourd Crafts: 20 Great Projects to Dye, Paint, Carve, Bead, and Woodburn in a Weekend” will be released this winter by Lark Books.
“There’s no long learning curve when it comes to gourds. The first time out with a gourd will be a success.”
What is the lure of gourds? It’s their earthiness and unintimidating nature, says Carol Morrison, a Palo Alto cultural anthropologist whose hobby is growing and crafting gourds.
“Gourds have a sensual feel that’s almost like skin,” she says. “And they’re so easy to work with. People who think they aren’t artists pick up a gourd and begin working on one and suddenly discover that they are artists.”
Hard-shell gourds (lagenaria) have been grown and used for thousands of years and are a staple in many cultures as storage vessels, utensils, dishes, water containers, baby bathtubs, seed containers, vases and musical instruments. Though their main use has been utilitarian, many cultures over the years also have adorned them with designs and patterns.
You can make just about anything out of gourds, says Sunnyvale gourd artist Janet Hatfield, who specializes in painting gourds with Native American designs. “There’s a plethora of projects for the gourd crafter, from dolls to birdhouses to jewelry.”
And bowls, vases, cups, candleholders, tortilla warmers, tea cups, musical instruments, Christmas tree decorations, nativity sets, cornucopias, planters, lamp shades and even bells.
Let your imagination be your guide.


PREPARING CRAFT GOURDS

Gourds are easy and fun to work with and they won’t break your bank or take weeks to make.
As a matter of fact, there’s plenty of time to create holiday decorations with gourds, including tree ornaments, says gourd crafter and author Ginger Summit.
Here she tells how to clean and prepare your gourds for crafting:
The gourd must be completely dry before it can be crafted. Shake the gourd. It should be light in weight. If the seeds rattle, or the pulp thuds against the gourd’s interior, it is dry.
Most gourds available for crafters through gourd farms have already been dried. They will generally be covered with mold and dirt, which must be removed. Follow these steps:
1. Soak the gourd in warm water for up to 15 minutes, then scrub off the mold and dirt with a metal kitchen scrub pad. For many projects, the gourd is now ready to be decorated, although you may also want to go over the shell with very fine wet/dry sandpaper to remove any blemishes or rough spots.
2. Cut the gourd shell to clean the interior. Most tools designed for woodworking are suitable for gourd craft as well. Mark the line where you will be cutting.
Stabilize the gourd on a foam pad and with a sharp kitchen knife make a hole in the gourd shell large enough to accommodate the blade of a small keyhole or hobby saw.
Use the saw to carefully cut on the line you have drawn on the gourd shell. You can also use a power saw.
3. Remove the gourd top and pull out all the loose pulp and seeds. Scrape out the pulp that is stuck on the interior of the shell with a serrated utensil, such as a grapefruit spoon.
When the gourd interior is clean, file and sand the cut edge of the opening.
A word of caution: Many people are allergic to the dust created when cutting and cleaning gourds. Wear a mask during this portion of the work and work in a well-ventilated room or outdoors. Squirting the gourd’s interior with water as you work will also minimize dust.


CREATING A PAINTED DIPPER GOURD

For thousands of years around the world, gourd dippers have been used as cups, spoons and ladles, says gourd craft expert Ginger Summit, who offers instructions for creating a festive dipper gourd.
1. Clean the outside of the gourd. Cut in half lengthwise and clean the interior. File and sand the cut edge.
2. Brush a coat of salad bowl oil on the interior of the dipper.
3. Draw decorations on the gourd in pencil, such as autumn leaves or sprigs of holly. Be sure to extend the design to the gourd handle.
4. Use acrylic paints to fill in the design.
5. With black pen or permanent marker, outline the design and and add details. Let dry.
6. Use dimensional paints to create texture. Let dry.
7. Seal with clear polyurethane. (Before spraying on, test on a scrap of gourd to make sure that the polyurethane won’t make the design run.)


WHERE TO FIND THEM

The shiny, often bumpy gourds in stores this time of year are ornamental, generally not used for crafting.
You want hard-shell lagenaria gourds, which can be grown in your garden or bought at gourd farms, where you’ll find thousands of gourds of different shapes and sizes.
Gourds that were grown this summer and harvested recently won’t be ready for decorating for two to six months, when they are dry. If you want to try gourd crafting sooner, contact a gourd farm and choose from last year’s stock.
Most gourd farms do mail order. Gourds generally range from $1.25 to $4 apiece, with very large gourds costing up to $30.
— Zittel Farms, 6781 Oak Ave. (near Folsom Auburn Road), Folsom; (916) 989-2633.
— The Tree Mover Tree and Gourd Farm, Palmdale; (661) 947-7121.
— The Gourd Factory, Linden; (209) 887-3694.
— Rocky Ford Gourd, Cygnet, Ohio; (419) 655-2152. Specializes in seeds, but some gourds are available. — The Caning Shop, 926 Gilman St. (at Eighth Street), Berkeley; (510) 527-5010. Web site: www.caning.com. Carries a variety of gourds, gourd crafting supplies and books. — Blithe Spirit, 18 E. Blithedale Ave. (at Throckmorton Avenue), Mill Valley; (415) 383-6427. The gallery has decorated gourds by crafter Nancy Miller.

Project Link
Date:
© Julie Bawden-Davis

Plants rise from your kitchen scraps / Trees, vines, indoor gardens sprout up

Looking for a fun, educational project for the kids or just something different for your indoor garden? Try growing plants from kitchen scraps.
We’ve all heard of soaking and rooting avocado seeds indoors. Did you know you can also grow apple and lemon trees from seed? Pineapple tops transform into attractive plants and yams create a long, handsome vine.
“In every kitchen garbage bin there is a garden waiting to be planted,” says Judith Handelsman, a Laguna Beach garden writer and author of “Gardens From Garbage: How to Grow Indoor Plants from Recycled Kitchen Scraps” (Millbrook Press, 1993).
It’s easy and fun to grow new plants with leftover fruits and vegetables. Here’s how:[/vc_column_text][vc_column_text]– Apples: Apples make an attractive indoor tree. Plant several apple seeds at once — germination is not high. If possible, try various apple types. Before planting, soak apple seeds overnight in warm water.
Plant six to 12 seeds in a high quality potting soil. Press the seeds into the soil slightly and cover with a thin layer of soil. Keep moist. Apples may take a month or more to germinate, so be patient.
— Avocados: When grown indoors, avocado trees won’t fruit, but they will become large, tropical floor plants. First, wash the seed and let it dry overnight. To plant, peel off the brown outer skin. Stick four toothpicks in the center of the seed at equal intervals. Place in a jar of water with the flat side of the seed down and the pointed side up, leaving one-third of the seed in water. Store in a dark place such as a kitchen cabinet.
Roots will grow in the water and a stem will rise from the top of the avocado seed. When the stem is about 6 inches high, cut it off to half its size. Put plant back in the dark and wait another few weeks until the roots have thickened and a new stem has grown and reached about 6 inches. Bring the plant out into the light and wait for the leaves to green up.
Next, plant the avocado in soil. Be careful not to damage the roots by making a hole in the soil before sliding the plant in. Gently fill the hole with soil and tamp lightly. To encourage the avocado tree to grow full and bushy, pinch off new leaves.
For every two new leaves pinched, four should grow in their place.
— Citrus: Seeds of oranges, lemons, grapefruits, limes and tangerines are easy to grow. They will become small trees. In the right environment, which includes ample bright light, you may eventually get blooms and fruit, but that will take years.
To plant citrus, rinse seeds in warm water and soak overnight. Plant each seed 1/2 inch deep and 1 inch apart. Water and keep moist. Seeds can take a month or more to sprout. Once they emerge, place plants in the sunniest window of the house.
When plants have some foliage, encourage bushy growth by pinching off new leaves.
— Pineapple: The prickly top of the pineapple can be removed from the fruit and planted. When 4-6 years old, the plant may produce a fragrant pink or red flower, which bears a small, inedible fruit.
Cut the top off a ripe pineapple, leaving about 1 inch of fruit attached. Bury the fruit portion of the pineapple in potting soil, leaving the green crown exposed. Water well and place in a warm, sunny spot. Within one to two months the pineapple will root and begin to grow.
— Yams: Yams will grow long vines. Take an elongated yam and scrub well. Cut off one end and stick the bottom with four toothpicks at even intervals. Place in a wide-mouth jar filled with water, the cut end immersed. Vines will grow from the eyes in the upper portion of the yam.
Place yams in bright light, but no direct sun. White roots will fill the jar and purple leaves will sprout from the top. Leaves will become bright green as they grow. Always keep the jar filled with water and change the water when it becomes cloudy.

Project Link
Date:
© Julie Bawden-Davis

Make Houseplants Part of Your Interior Design

One of the great advantages of growing houseplants is how good they make your home look.
“It’s the details that make the difference in really pulling a home together,
and houseplants are one of those essential details,” says interior designer Michaelin Reamy, owner of Natural Color and Design in Menlo Park.
“Indoor plants make great decorator pieces,” agrees Mill Valley interior designer Stacey Lapuk. “Most furnishings and architectural details are comprised of hard surfaces and straight lines, but houseplants add softness and depth to a space.”
Houseplants make a home feel lived in, says Debbie Jorgensen, owner of Patt’s Greenhouse in Los Altos. “Plants give the indoors a comfortable, inviting feeling.”
TOP LIFESTYLE VIDEOS: Story continues below | Breaking news first: Sign in for newsletters

With their wide variety of leaf shapes, sizes, colors and textures, houseplants can be used to decorate just about any interior, and they serve a wide variety of design purposes.
“Houseplants can be used to make a room look larger,” says Lapuk. If you want to make a ceiling appear higher, for instance, put a tall, slender plant, such as Dracaena marginata, in a corner. To fill in dead corners, use a tall, bushy plant like Ficus benjamina. If you don’t have enough space for floor plants, try hanging houseplants, which often have the added benefit of flowering.
Another tactic for making rooms look larger is to place houseplants near windows where there is greenery outside, so that the indoors appears to be an extension of the outdoors.
You can also use houseplants to make large rooms look smaller. Accomplish this by bringing in a plant that is oversized for the space, which will make the ceiling feel lower, or choose a plant that grows up and then drapes. A good draping choice is the ponytail plant (Beaucarnea recurvata).
Plants can also be used to break up large living spaces and create transitions between rooms.
“If your home’s design is such that you step right into your living room when you enter your house, you can make the entry less jarring with a line of houseplants,” says Lapuk.
Plants can also be used to direct traffic flow. A pink orchid in the entryway, for instance, can lead people into a living room seating space where there is a calathea with variegated pink and green leaves.
To have success decorating with houseplants, keep these tips in mind.
— CREATE FOCAL POINTS. Houseplants — such as those that bloom — add to a room’s decor when placed in the spotlight. Rather than putting short-lived cut flowers on the dining room table, try orchids, African violets, anthuriums or plants with colorful foliage.
Other good spots for eye-catching plants are coffee tables, entryways, the foot or top of stairs, kitchen counters and fireplace mantels.
— TIE A SPACE TOGETHER. Plants can be used to create intimate spaces. Flank a sofa with flowering plants and on the coffee table add a plant with a similar color, and the whole space will feel cozy and comfortable.
— CREATE GROUPINGS. Clusters of small plants add a decorative touch to certain areas of the home such as desks, pianos, fireplace mantels, credenzas, hutches, dressers and nightstands, and in bathrooms next to sinks or on bathtub decks.
They can be placed in individual decorative pots or grouped together in a basket or larger pot. When grouping plants in a larger container, leave each plant in its own container and camouflage with moss.
Groupings look especially good if there is a combination of flowering and foliage plants. If you’re doing all foliage, choose plants with leaf colors that blend well. Herbs would be a good choice for the kitchen.
— CONSIDER PLANT STYLES. “The type of plants you choose will dictate the feeling of each room,” says Lapuk. “Some plants, like orchids, lend an elegant, sensuous atmosphere to a room, while others, such as the rubber plant (Ficus elastica), tend to give a room a more informal, heavier feeling.
“Pay careful attention to the size, weight, texture and shape of each plant and determine if it will help open up a space or make it more cozy. You’ll want heavier looking plants in a den, for instance, but a bathroom will probably call for something lighter.”
— CHOOSE YOUR CONTAINERS CAREFULLY. Except for hanging plants, pots — especially small ones — are a highly visible part of designing with houseplants. Make sure that a container’s color, design, shape, size and texture match room decor and contribute to the atmosphere you’re trying to create.
— TRY PLANT ACCENTS. There are a wide variety of accessories you can use with houseplants to make them even more decorative and to tie a decor together. These include plant sticks made of materials such as ceramic, wood and beads.
You’ll find various accents such as little birds, insects and butterflies. For the holidays, decorate with items like gourds, berries, red ribbons and small Santas.

Project Link
Date:
© Julie Bawden-Davis

How Do I Add a Trellis to the Pot of My Philodendron?

How Do I Add a Trellis to the Pot of My Philodendron?

You can use metal netting to make your own philodendron trellis.

You can use metal netting to make your own philodendron trellis.

Glossy plants whose leaves range in length from 3 inches to 3 feet, philodendrons (Philodendron spp.) vary widely in appearance. Although a few shrubby types such as the split-leaf Philodendron bipinnatifidum can grow outdoors in U.S. Department of Agriculture plant hardiness zones 8 to 11, most are hardy only in USDA zone 11 and raised as houseplants elsewhere. Vining varieties such as heartleaf philodendron (Philodendron cordatum) climb on trees in their native habitat and will require a similar support in pots. So-called “self-heading” plants that don’t vine, such as Philodendron wendlandii, don’t need a trellis.

Jangkau Pelanggan dengan Keywords yang Tepat. Mulai & Dapatkan Kredit Rp450rb.

google.co.id​/​AdWords

Tanscending the Typical Trellis

Because climbing philodendrons have aerial roots, they require a different kind of trellis than most houseplants. Instead of stakes or latticework, give your plant a rough and preferably damp support to which those roots can attach themselves. Most sources recommend moss-stuffed or moss-covered poles, often called totems, which you can either purchase or construct yourself. Other possible supports include slabs of bark or tree fern similar to the tree trunks the plants scramble on in the wild.

Trumping Up a Totem Trellis, Number One

It’s best to wear work gloves when putting together totems, to protect your hands from sharp wires and the fungi that can live in sphagnum. To construct a moss-stuffed pole, roll up some type of stiff mesh, such as hardware cloth, so that it forms a cylinder as wide and tall as you want your pole to be. Copper mesh will work best, because it is rust-proof. When you get your cylinder the right size, tie its sides in place with copper wire and tightly stuff its center with damp sphagnum moss. You don’t need to fill the part that goes beneath the soil.

Trumping Up a Totem Trellis, Number Two

To make a moss-covered pole, begin with a piece of PVC pipe as high and broad as you want your totem. After taping a piece of fishing line or copper wire to one end, wrap pieces of sphagnum moss around the pipe, holding the materials in place by winding the line or wire around them intermittently. Once the entire length that will protrude above the soil is covered, tie off the line or wire.

Trying the Totem Trellis

Plan to repot your philodendron when you attach it to the totem, and insert the totem into the center of the new pot of soil first. You can then plant the philodendron beside the pole or slab, tying some of the vines to it with gardening twine or tape until they have time to take hold of the moss or bark surface themselves. You’ll need to mist the totem frequently to keep it damp.

Your Best Store to Home & Garden

id.wellindal.com

Tailored solutions,Start with the customer’s demand,end with the satisfaction!

lmzggroup.com​/​MobileCrusher

Langsung dari Gadgetmu

siaranku.com

We’ve Compiled 4,700+ Free Reviews to Find You The Best Garden Trellises!

wiki.ezvid.com​/​best-gardentrellises