The beloved Italian dessert is way easier to make than you think using your Pizzelle Maker! Our basic vanilla pizzelle batter cooks up into crispy little shells. Just whip up some of our amazing Cannoli Dip to use for filling and blow them away with your bakery beautiful dessert!
Holidays often bring the added benefit (or curse, depending how you look at it) of houseguests, and one of the most welcoming things you can do is provide visitors with the comforts of home.
Make your house inviting and the visit run smoothly by offering your houseguests the following amenities:
Comfortable sleeping arrangements
While a couch or sofa sleeper will do, an AeroBed inflatable mattress offers the comfort of a real bed and can be set up in any area, which allows you to provide your guests with maximum privacy. Like real beds, AeroBeds come in a variety of sizes, including toddler, twin and queen.
Make the bed with crisp, cotton sheets and accommodate for different sleeping styles by including lightweight and heavy blankets. Top the bed off with fluffy pillows and your guests are sure to experience sweet dreams.
Bath essentials
A well-stocked bathroom promotes a pleasant stay and saves your guests from the indelicate task of having to ask you for toiletry items — and saves you from running around looking for that extra toothbrush you brought home from the dentist’s office. Supply the bathroom with fluffy towels in several colors so that you and your guests can color code and easily keep track. If you’ll be hosting young guests, invest in a collection of inexpensive towels and washcloths in fun, festive colors. If you provide a pop-up laundry hamper, you can hope that they might actually use it, so you won’t be finding piles of damp towels in the corner.
Avoid the inevitable clutter that occurs in the bathroom with a full house by providing your guests with a shower caddy they can carry to and from their room loaded with bathroom necessities such as inexpensive toothbrushes, toothpaste, mouthwash, a hairbrush, sample-size shampoo and conditioner, soap, lotion, disposable razors and shaving cream.
Also make sure that the bathroom is well-stocked with necessities like toilet paper, tissue and a hairdryer.
Storage
Make guests feel welcome by providing empty space in cupboards and the closet. Provide a variety of hangers so that they can hang dresses, blouses, pants and heavier items like coats. If storage is limited, the pop-up hampers can come through for you again, this time serving as storage containers for things like extra blankets.
Information & Communication
Give your guests the proper tools to make notes and communicate with those back home by filling a basket or organizer with a notepad, pens, paper, notecards and postcards, envelopes and stamps. For the more technologically inclined, provide a card with the name and login for your WiFi network. It’s also helpful to provide a list of local restaurants, museums, amusement parks, movie theaters and any other appropriate local attractions, so your guests won’t be completely dependent on you to keep them entertained. Write out directions for the technology in your home: how to use the cable remote, the video game console, and so on, and put it in the room where your guests will be sleeping. It will spare you from being peppered with “How do I…” questions.
Snacks and water
Chances are you’ll feed your guests, but it’s also nice to leave a few snacks and water in the room so that they don’t have to worry about waking up the house in the middle of the night if they get thirsty or hungry. Stock the room with glass canisters filled with nuts, dried fruit and crackers. Water bottles work, but a decorative carafe is more economical and environmentally friendly.
Entertainment
A bookcase full of a variety of books for all ages is a good addition to the room, as well as a television set and access to movies.
Other essentials
A mini ironing board and iron are important to smooth out travel wrinkles, and a mirror is always useful. If you’ll be hosting small children, make sure to childproof the room with items like electrical outlet covers.
Planning ahead and preparing for holiday houseguests allows you to make your visitors feel welcome the minute they walk in the door, which means you can relax and enjoy their visit.
Julie Bawden-Davis
Considering the varied activities we perform in the bathroom, a multifaceted lighting system is your best choice for a well-lit room. The following lighting types all combine to create a functional and attractive bathroom lighting design.
Ambient
Also referred to as general lighting, ambient lighting illuminates the entire bathroom when you flip on the switch and walk into the room. Such lighting allows you to easily navigate the space and find items quickly. Ambient lighting also tends to be soft, which gives your skin a pleasing appearance in the mirror.
The most effective ambient lights for illuminating the entire room tend to be ceiling mounted flush or semi-flush fixtures. How large of a ceiling mounted light you install will depend on the size of the bathroom. The smaller the bathroom, the smaller the fixture should be.
If the bathroom is especially tiny, instead of a ceiling fixture, use a few strategically placed recessed lights. Such a lighting system will sufficiently light up the space, and since they are flush with the ceiling, recessed lights won’t make the small space look even smaller or cluttered.
Task
Vanity lights, which consist of a row of usually three to four fixtures, are generally installed above mirrors in the bathroom, while some vanity lights are a part of the vanity itself. Such lights tend to be bright, giving you ample illumination to perform tasks such as shaving and makeup application. When you want a more calming, peaceful atmosphere for activities such as bathing, vanity lights can be turned off.
Wall sconces also provide a good source of light in the bathroom for performing various tasks that require high light. It’s generally suggested that you place sconces on both sides of the mirror, which will help prevent shadows and give you the best illumination for close-up work.
Accent
As its name suggests, accent lighting allows you to spotlight certain elements in the bathroom such as pieces of art and architectural features like tile work. Such lighting also gives you the opportunity to create depth in the room.
Accent light fixtures include spotlights, pendant lights and decorative light fixtures. Because such lighting tends to be subdued and limited in scope, it is also used to create a relaxing, peaceful mood in the bathroom. Such lighting is only effective when the general ambient lighting is turned off.
Natural
Bathrooms with windows and skylights can also take advantage of outdoor lighting during the daytime hours. How much lighting you have to work with will depend on window positioning, how many windows the room has and their size. Skylights give the most light, while northern exposure windows let in the least amount of sun. The bigger the window, the more natural light the room will get.
Now that you’re illuminated regarding the various lighting options for your bathroom, you can light up the room with confidence.
Considering that thousands of injuries occur in bathrooms each year, it’s wise to take bathroom safety seriously. While young children and older adults are especially vulnerable, the fact is that everyone is at risk. According to the Centers for Disease Control and Prevention (CDC), 235,000 people over age 15 suffer injuries from bathroom accidents.
Help ensure no accidents occur in your bathroom by keeping the following safety tools and techniques in mind:
Avoid Slips and Falls
Prevent dangerous falls in the bathroom by incorporating a variety of products designed to keep things steady and secure. The bottom of the bathtub and shower can get perilously slippery, especially when coated with soap and shampoo residue. Apply non-skid decals or use a nonslip mat. Outside of the tub or shower, use a rug or mat with a non-slip tread or backing that fastens securely to the floor.
Installing grab bars at the entrance of the shower or tub also decreases the likelihood of falls. In addition, older individuals may find shower benches and bath chairs helpful. And young children are less likely to fall if they are placed in bath seats, which secure to the bottom of the tub with suction cups.
Also prevent slips and falls by keeping the floor clear of water at all times. And if you must step up to get into the bathtub or shower, make sure to use a non-skid bath safety step.
Prevent Drowning
Because of the prevalence of water in the bathroom, very young children are vulnerable to drowning in this room. Prevent accidents by never leaving kids younger than six-years-old unattended while bathing. Also always empty water from the bathtub after use and install toilet locks.
Steer Clear of Burns
Avoid scalding and burns in the bathtub by keeping your hot water heater set below 120 degrees Fahrenheit, or install an anti-scald valve. To ensure the water isn’t too hot, you should be able to run the water over your hand without burning yourself. Protect young children from accidental scalding by keeping little hands away from faucet handles. A spout cover keeps kids otherwise occupied and protects them from bumping their heads on hard faucets.
Practice Electrical Safety
Electricity and water are a dangerous combination. Unless in use, keep all electronic items such as hair dryers and curling irons, unplugged. For added safety, store such electrical appliances well away from the bathtub, shower and sink.
If your bathroom doesn’t have a ground fault circuit interrupter (GFCI) outlet, have one installed by an electrician. With such an outlet, the electricity shuts off immediately if an appliance comes in contact with water or begins to malfunction.
Other Precautions
When children are present, keep dangerous items like razors and cleaning products out of reach. Store all medication in childproof containers and place medicine in a locked cabinet.
A bathroom nightlight also helps everyone safely find and use the bathroom at night.
Taking these safety precautions may require some effort, but the result of a secure bathroom environment for everyone is well worth the effort.
Designed to accurately and precisely weigh food ingredients so that you can skip the guesswork, kitchen scales are an indispensable kitchen tool. Use them to measure out the desired amount of foods according to dietary requirements, or just to more accurately measure various ingredients for your baking and cooking. Widely-used in Europe, many recipes feature ingredients measured by weight. Cooks in every country find kitchen scales a useful addition to their kitchen.
Before purchasing a scale for your kitchen, weigh in on the following six tips for choosing the best model for your needs.
1. Analog versus Digital
There are two types of kitchen scales from which to choose. Analog, or mechanical scales, consist of an inner spring that shows the weight with a rotating pin. Electronic or digital scales run on batteries and display the weight on a digital readout. They also tend to feature a variety of additional capabilities, including the fact that some models can store data. Most of today’s kitchen scales are digital models. The digital readout shows a decimal value, which is usually accurate to the nearest tenth of a unit.
2. Capacity and Sensitivity
Consider what foods you will most likely weigh in order to determine how much capacity you require in a kitchen scale. Some especially sensitive scales are ideal for weighing up to 16 ounces, including lightweight items like herbs, spices and nuts. Other types of scales can handle up to 15 pounds. The latter scales are appropriate for weighing heftier items like large cuts of meat and whole poultry.
3. Enhanced Digital Features
Digital scales possess a wide variety of features that you may find useful, depending on your goals. Such perks include the machine’s ability to switch between various units of measurement, including pounds, ounces, grams and kilograms. Another helpful feature is a tare function, which enables the scale to consider the weight of the container and only display the weight of the contents. Some models also possess a baker’s timer and clock.
There are even scales that are programmed with calorie readings for various foods. Such models allow you to add your own recipes and food entries, and some have a memory feature that tracks your calories.
4. Platform and Container
Platform sizes vary. It is often a good idea to get a scale with a generous-sized platform so that you have room to weigh a variety of foods. Also choose a scale that comes with a container that holds the foods for weighing, including dry and wet ingredients. Make sure it’s removable for easy cleanup. Some models come with a measuring bowl attachment, which allows you to easily measure out ingredients.
5. Easy-to-Read
Not all digital displays are created equal. Some are small and hard to read, so test out each model if possible and opt for a large digital display. Also look for displays that don’t get hidden when you cover the scale with items to weigh.
6. Design and Ease of Storage
If you store the scale on your kitchen counter, it’s important to choose a model that fits well and adds to the look of your kitchen. A wide variety of styles exist, with many in stainless steel, which adds a sleek look to your kitchen.
Now that you’ve “weighed” all the differences between kitchen scales, you can purchase a model that enhances your cooking experience and helps you meet your dietary needs.
Gone are the days of boring, white, mechanical scales that hated you as much as you hated them. Modern bathroom scales are more fashionable than ever. And having just the right one can motivate you to stay on track with your health and fitness goals. Here, a few guidelines to help you choose the right one.
1. Know Thyself
A straight-forward digital scale may be best, if you only want to monitor your weight. Otherwise the options are endless. Many models can track weight for multiple people and have ranges up to 550 pounds, which can be useful if everyone in your home will weigh in. For those who want additional data, some scales also measure body mass index (BMI), body fat, muscle percentage, bone mass, body water, calorie consumption, and even metabolic age. Connected models, like the FitBit Aria, share weight data with an app that also tracks activity and food-logging. It’s awesome to have these features, if you plan to use them. Be honest about your lifestyle, health goals, and avoid getting more than what you truly need.
2. Choose An Easy Read
Large LCD screens are just one way to boost readability (no squinting please!). You can also choose a model with high-contrast backlighting or one with an electronic voice feature that speaks your weight aloud, as long as you don’t mind sharing that information with passersby.
3. Rock Your Style
Since you’ll view this piece of equipment daily, it’s important to like what you see. Choose a model that suits your bathroom decor or pick one that speaks to your personality. There’s stainless steel, glass, prints, gorgeous landscapes (just look at the one above!). Finally, weighing yourself will actually be fun!
Julie Bawden- Davis
Successfully carving a juicy beef roast or a plump turkey before you transfer to a serving plate requires that you use a carving board. Designed for cutting pieces of meat and collecting their juices, carving boards are an essential kitchen tool to have if you serve entrees such as roasts, turkey, chicken and fish.
Familiarizing yourself with the following aspects of a quality carving board will help you choose the best model for your kitchen.
1. Size
Considering that a 16-pound turkey can measure 16 to 17 inches in length, it’s important to choose a board that will accommodate large pieces of meat. A good size that will enable you to easily cut just about any piece of meat is 20 to 21 inches long by 14 to 16 inches wide. Of course, if you only cook small pieces of meat, a 14-to 15-inch-long board will suffice.
2. Materials
A majority of carving boards come in wood, plastic, glass, and acrylic models. Wood carving boards are generally crafted from long-lasting, durable hardwoods, such as bamboo, maple, teak and acacia. Wood boards must be washed by hand. They also generally require conditioning with mineral oil before use, as well as periodic re-conditioning.
Plastic carving boards also hold up well to cutting. They have the added benefit of being non-porous, which means they resist odors and cut marks. Plastic is dishwasher safe.
Glass cutting boards are the most hygienic, dishwasher safe, yet will dull knives the most over time. They are prone to cracking and chipping.
Acrylic cutting boards are light-weight, dishwasher safe, and chip resistant. Their clear color blends into any kitchen decor so you can leave them on your counter.
3. Functionality
The best carving boards have features that make the process of cutting and serving meat as efficient as possible. So that the board stays put when you perform the delicate operation of carving the meat, some carving boards possess a raised rubberized rim that grips the surface of the counter or table.
Other models keep the meat itself in place. Some have raised pyramid points that puncture the meat and others feature an oval-shaped well in the center of the board that gives the meat a place to securely sit. These anchoring functions, as well as handles, also make it easier to transport the meat to the table without worrying about it sliding off the board and onto the floor.
4. Adequate juice trench
Many cooked pieces of meat emit juice when you cut into them that you may want to save and use for gravy, so it’s important to choose a model with a generous juice trench. The juice trench, which consists of a well around the perimeter of the board, should be deep and wide enough to catch the liquid without draining onto the countertop. Some juice trenches feature a notch on the rim that serves as a pouring spout and enables you to easily drain the juice into a pot for making gravy.
5. Versatility
You probably won’t always be carving pieces of meat, so it pays to get a reversible carving board that allows you to carve on one side and flip the board over to a flat side for other kitchen cutting chores, such as chopping, dicing and mincing.
Flexi Mats are affordable, multi-purpose mats. They are bendable, enabling the user to “funnel” chopped food into a pot, pan or bowl. Most flexi mats are color coded to prevent cross contamination and are dishwasher safe.
A meat thermometer ensures that you cook meat sufficiently and evenly. Knowing what to look for in this vital culinary tool helps you choose the right model for your kitchen.
Check out the following must-know facts before buying a meat thermometer:
1. Types of meat thermometers
Several types of meat thermometers exist, all featuring a different type of design and varying usage requirements.
*Oven-proof, dial meat thermometers have a thick post that you insert into the meat, and you leave these models in during cooking. The dial on these thermometers accurately displays the internal temperature of the meat, as long as the cut is at least 2 inches thick.
*Digital or dial instant-read meat thermometers are not designed to place in the oven, but are instead inserted into the meat at the end of the cooking time when you want to measure internal temperature for doneness. These display a digital or dial reading after just a few seconds.
*Microwave-safe thermometers are designed specifically for microwave ovens.
*Probe thermometers are two-piece systems. The probe remains in the food while it’s cooking, but the base of the thermometer stays outside of the oven, and the display shows you the internal temperature of the food as it cooks. Many models feature pre-settable alarms that allow you to choose the type of meat you’re cooking and how well you want it done. There are even portable probe thermometer systems that you can carry around with you that announce when your food is cooked to specifications.
*Temperature forks aren’t designed to stay in food during cooking, but are instead used to test for doneness. Such thermometers read in just seconds and are ideal for testing grilled foods.
2. Accuracy
Most meat thermometers are fairly accurate and aren’t generally off by more than 1-2 degrees. Some meat thermometers have a test mark that you can use to measure for accuracy. You place the thermometer into boiling water up to the test mark and verify that it reads 212 F. Instant-read types of thermometers often have a re-calibration feature that can be used when necessary to adjust the thermometer for accuracy.
3. Ease of Use
Some meat thermometers are easier to read than others, depending on the style of the dial. You may or may not be able to read an oven-proof thermometer through the oven door, so this is a consideration. Probe thermometers are especially easy to use because you simply insert the thermometer in the meat and then read the display that sits outside of the oven.
Digital/dial instant-read thermometers and temperature forks are a little more cumbersome because you must remove the meat from the oven in order to test for doneness.
Meat thermometers that stay in during cooking are hot to the touch and must be removed with caution.
4. Durability
Many meat thermometers are made with durable stainless steel and some are dishwasher safe. The glass on most thermometers is shatterproof.
Now that you know all about meat thermometers, you can choose the best model for your upcoming cooking needs.
Tell us which do you prefer — a digital or dial instant-read thermometer?
Cooking tender, succulent roasts and poultry, tasty veggies and bubbling batches of lasagna requires the right roasting pan. With the many pans on the market, it pays to take the time to choose a high quality roaster.
Before investing in a roasting pan for your kitchen, be sure to consider these five key criteria of choosing a top-notch pan.
1. Construction
Thick, well-made roasting pans distribute heat well, which means even cooking and superior browning. Choose a pan with some heft. Thin pans lead to spotty browning and burning. They also warp and buckle, which is especially problematic when you’re attempting to deglaze the pan to make sauce or you’re trying to sear the meat before putting it in the oven.
2. Materials
Roasting pans come in a variety of materials, including stainless steel, which is a particularly good choice, as it is strong and doesn’t warp. It’s also an attractive piece of cookware that can be brought to the table. Aluminum is another common roasting pan material, but it reacts with acidic ingredients and can warp. It is, however, a better conductor of heat than stainless steel.
Nonstick roasting pans are available and make for easy cleanup, they don’t work well for deglazing and creating sauces, which rely on browned-on pan drippings for their rich flavors. The nonstick finish can also be rubbed off by the roasting rack.
3. Size and depth
The size and depth of the roasting pan also affect its performance. Choose a pan that is roomy enough for large pieces of meat and poultry, which shouldn’t touch the sides of the pan, but make sure that it will fit comfortably in your oven and that it isn’t so large that the meat juices burn.
In terms of depth, keep in mind that while shallow pans tend to cook foods more quickly, they don’t lead to as much browning as deeper ones and can cause vegetables to dry out rather than cook in their own juices. When you are braising or making sauce on the stove in a shallow pan, the juices also tend to easily slosh over the sides.
4. Handles
For safety and easy handling, look for a roasting pan with upright, riveted handles that are fixed, not movable The handles should be easy to grasp when wearing oven mitts, but not so large that they get in the way when you put the pan in the oven or from fitting in your dishwasher.
5. A Rack
A rack suspends the piece of meat you’re roasting so that the heat makes contact with the underside, creating a crispy coating on the bottom. Suspending the roast or poultry also allows the juices to drip rather than get absorbed back into the meat.
Look for a durable rack that will not bow when you set a large piece of meat on it. And choose one that has handles that are opposite to those of the roasting pan, so that you can easily differentiate between the two.
Now that you know what makes a high-quality roasting pan, you have all the information you need to choose the best roaster for your kitchen.
Popular for many years before food processors and blenders hit the culinary scene, manually operated food mills perform a task that their electric counterparts can’t. In addition to pureeing whole foods like apples and tomatoes, food mills strain out seeds and skin as they work, leaving you with fresh, rich homemade sauces.
These uncomplicated kitchen gadgets used by our grandmothers to make everything from tomato and apple sauce to mashed potatoes, jelly and juice, are simple to use. You just prepare the items to be milled, throw them in and start cranking. As you crank, the food is pushed through a perforated disk-shaped sieve, leaving seeds and skin behind and resulting in a dense, ultra-smooth puree.
Before adding a food mill to your collection of culinary gadgets, familiarize yourself with these top 5 traits that make a quality mill:
1. Capacity
The size of a food mill’s hopper, which is the bowl into which you put the food to process, affects how much food it can mill at once. There is everything from small food mills capable of grinding a cup or two of food at a time to large food mills that will process eight quarts at once.
Some food mills come with an attachable bowl into which the processed food falls, while others are equipped with a hook and handle or movable side leg hinges that secure the mill over a bowl or stock pot.
The size food mill you choose will depend on how much food you expect to process at once. If you just want to make small batches of baby food, a small capacity food mill will suffice, but if you have a large family and expect to process big batches of foods like mashed potatoes, you’d be wise to choose a larger capacity model.
2. Ease of Use
Since you’ll be doing all of the work, it’s important that the food mill you choose is easy to crank. Some come with ergonomic handles, which puts less strain on you. If possible, try cranking several food mills before making your final decision.
3. Cleaning simplicity
The food mill should be easy to disassemble for cleanup. Look for food mills with removable, rather than fixed, disks, the latter of which are significantly more difficult to clean.
4. Interchangeable disks
The most versatile food mills have interchangeable disks featuring various hole sizes, enabling you to choose the texture of the foods you mill. The different sized disks generally allow you to puree foods either fine, medium or coarse. This versatility is important if you wish to process a wide range of foods with varying consistencies.
5. Materials
Original food mills were made of lightweight and durable tin, and they are still available in this metal today. Stainless steel food mills are also common. Such models tend to be well constructed and durable, and the fact that they are non-staining means they tend to stay looking brand new. Plastic food mills also exist, and they tend to work well, but over time, plastic doesn’t hold up like metal, so it’s best not to buy this type of mill if you expect heavy usage.
Now that you know the basics when it comes to choosing the perfect food mill, you can get cranking and make Grandma proud.
Are you a fan or those simpler kitchen gadget days? Share you thoughts in the space below.
Dying to decorate for Halloween but not excited about storing boxes of ghost and goblin decorations the rest of the year? Add a spooky, yet sophisticated touch to your home by using non-Halloween items to create a holiday feeling.
Try these “tricky” decorating treatments.
Highlight linens
Black and pumpkin-colored tablecloths lend a Halloween air to the table. Try a black tablecloth as a base and top it with autumnal colored table runners. Outfit the bathroom with black and orange towels. And cover your sofa with a black throw topped off by orange or rust colored toss pillows
Do the disposable route
Not a fan of black and orange linens? Pick up some disposable, one-time only tableware entertaining kits with Halloween themed dinner and dessert paper plates and napkins.
Go with pumpkins and gourds
Pumpkins are an ideal decorator item that can be used throughout November as well. As long as you don’t cut pumpkins, they will generally last for two months or longer. Instead of carving pumpkins for an outdoor display, draw scary faces on one side, which allows you to turn the pumpkins and hide the faces once the holiday passes. Gourds will last indefinitely and fit a wide variety of seasonal décor themes.
Light up with candles
Give guests a ghoulish greeting by flanking your front door with pumpkins surrounded with black candles. On the dining room table or fireplace mantel, create an eerie focal point by mounting orange candles on a black candelabra, or lend a light and fun feel to the atmosphere by decorating with pumpkin-themed luminaries containing battery-operated candles. Candy Corn or Pumpkin-Patchscented candles add a festive aroma and mood to the air throughout several holiday seasons.
Try bottles
An arrangement of old apothecary bottles gives the illusion that you’ve been mixing secret potions. In the bathroom, fill such bottles with soap and lotion and do the same at the kitchen sink. Use wide-mouthed jars for Halloween treats and label them with creepy names like eel eyeballs for chocolate balls and monkey teeth for candy corn.
Decorate everyday items
Easily add Halloween flair to common items in the home using techniques such as wrapping black and orange ribbon around bannisters and attaching it to mirror borders. Perch a decorative black cat on top of the television set and wrap banisters on the stairs or welcome your trick or treaters with orange string lights. Or add some color and a festive tone with flameless paper lanterns.
Adding a sophisticated, spooky touch to your home at Halloween is so easy and fun, it’s scary.
How savvy are you about your daily cuppa? See if you can separate truth from myth–and get a few great ideas for making the most of your beverage–when it comes to the coffee statements below.
1. The freezer or refrigerator is the best place to store your coffee.
Myth: Contrary to popular opinion, the cool air of the refrigerator or freezer doesn’t keep coffee fresher longer. High moisture levels in this environment can actually cause coffee oils to break down faster, and the coffee soon takes on flavors from surrounding foods.
Store your coffee beans and grounds at room temperature in a dark, cool, dry place like a closed pantry. Once the bag is open, transfer the contents to an airtight glass or ceramic container and use within one to two weeks.
2. For the freshest taste, grind coffee beans immediately before brewing.
Truth: Whole beans lock in volatile oils. Once beans are ground and exposed to light and air, the coffee’s aroma and flavor dissipate quickly. Store coffee beans whole and grind them right before you brew a pot.
3. The size of the coffee grounds affects taste.
Truth: The texture of your grounds greatly affects coffee taste. Generally, bitter coffee is an indication that the beans have been ground too fine; if the coffee tastes flat, you’ve probably not ground the beans enough to extract the full flavor, according to the National Coffee Association USA.
When grinding, use quick, short bursts. Holding the button down and grinding continuously tends to create too fine of a blend and can overheat the coffee, which negatively affects taste.
4. Coffee made in a French press is best.
Myth: While the French Press method is definitely an excellent option, you can get great coffee from drip, percolating, and vacuum brewing too. The most important factor in making coffee is that the water temperature reaches 195 to 205 degrees Fahrenheit, says Coffee Research.org.
5. Coffee stunts your growth.
Myth: Because of studies conducted some years ago on the elderly, whose diets were low in calcium, the myth started that coffee stunts growth. More recent studies focusing on adolescents found no direct link between coffee consumption and slow growth. According to Kidshealth.org, no connection exists between a child’s height and his or her caffeine consumption.
6. The kind of water you use to make coffee alters its taste.
Truth: Water quality greatly affects the flavor of your coffee. Heavily chlorinated tap water, for instance, creates poor-tasting coffee. Distilled and softened water are also not good choices, as they lack certain minerals that bring out coffee’s full flavor. Your best bet is filtered water or bottled water.
7. It’s important to clean your coffee machine.
Truth: Lingering residue in your coffee machine from previously brewed coffee imparts a stale or even bitter taste to your java. Wash the pot and plastic parts with soap and warm water after every use, and about every 15 pots, brew a solution of half water and half vinegar to clean out the interior of the pot, followed by a pot of plain water.
8. Caffeine is addictive.
Myth: Caffeine is a mild stimulant but doesn’t fit the addictive category, according to The American Journal of Drug and Alcohol Abuse. Your body may become accustomed to caffeine, so it’s best to cut down on coffee consumption gradually, rather than all at once.
When you think about ways to improve your work productivity, changing up your lighting might not be the first thing that comes to mind. But the quantity and quality of lighting for your home office can have a big impact on your ability to get things done.
But no single light can create the ideal illumination for every job at hand. To ensure your office is well-illuminated, you’ll need multiple lighting sources. Mix a few of the following lighting types together to create a great place to get things done.
Overhead Lighting
Also known as ambient lighting, overhead lights illuminate your entire office space. They provide sufficient light to work and ensure your ability to move around safely while creating a bright, welcoming space. Common sources of overhead lighting include ceiling-mounted fixtures using incandescent bulbs or fluorescent lighting tube fixtures.
While ceiling-mounted fixtures do a good job of illuminating a space, they tend to cast shadows and may not provide the brightness required for detail-oriented jobs, which is why you shouldn’t rely only on your ceiling light in your home office.
Task Lighting
As its name suggests, task lighting gives you focused, intense illumination so you can perform specific jobs, such as reading, writing, and working on the computer. Task lighting options include desk lamps, floor lamps, and pendant lights.
Proper positioning of task lighting is the key to its effectiveness. When you’re doing paperwork, for example, shine the light directly where you will be working. But avoid placing a task light where it will cast light directly onto your computer screen, as this can cause glare and eye strain.
Task lighting should not be used in lieu of overhead lighting, particularly if the room lacks natural light. That extreme contrast can tire your eyes.
Accent Lighting
Spotlights, decorative light fixtures and wall sconces may not provide a great deal of usable light, but they do lend atmosphere to your home office and can add to the room’s overall design. Dimmer lighting switches are included in this category and can be adjusted according to the task at hand. For instance, if you are talking on the phone in your home office and don’t need a great deal of light, you may want to rest your eyes by dimming the lights and using the accent lighting.
Natural lighting
If there are windows or skylights in your home office, plan to use the light they bring into the room to your advantage. First, arrange the room so that your computer monitor won’t get glare from the light coming in, or choose window treatmentsthat will let you control how much light you’re exposed to during the day (this is particularly important for windows with unobstructed southern or western exposure, whereas northern or eastern exposures can often get by with sheer curtains or adjustable blinds).
Now that you know the secrets to lighting up your office space, use these illumination tactics to create an eye-catching, productive work environment.
What’s your biggest challenge when it comes to arranging your home office?
Julie Bawden-Davis
With lazy summer days dwindling (how did it get to be August already?!), and busy school days looming, it’s time to prepare for the back-to-school transition. Try these stress-free steps for easing kids back into a school schedule.
1. Re-establish a School Routine
LEGO® Yellow Brick Alarm Clock
You’ll all have more energy for the first day if you don’t try to change your sleeping schedule all at once. Try going to bed and getting up a little earlier each day for a week, until you hit your school year bed- and wake-up times. You can also use this week to re-establish any school-day routines that you put on hold during the summer, like specific bath-times or nightly bedtime rituals like reading.
This gradual approach can help you ease into your morning schedule too: When you get up in the morning during this transition week, you can stay in your pajamas, but eat breakfast according to your school-day schedule.
As the first day of school approaches, help your kids set up their own systems of organization. Pre-pack backpacks together, and making sure that the most-used items (e.g., pencils, erasers, lined and graph paper, glue, rulers, and calculators) are easy to access. Then, prepare a quiet location in your house dedicated to homework: Stock the space with necessary supplies and make sure it’s well lit.
3. Plan Nutritious Meals
Itzy Ritzy® Lunch Happens™ Bento Lunch Box – Rock N Roll
Studies by the Academy of Nutrition and Dietetics show that healthy breakfasts and lunches lead to better learning. Guarantee that your children eat well by working with your kids to find the best meals for them before school starts. Involving your children in the choice and preparation of breakfast and lunch leads to a higher likelihood that they’ll eat what you make. You can also establish a routine with your children of packing their lunchboxes together before bed, which gives you a chance to talk about the upcoming day and makes the morning rush easier.
4. Talk up the Transition
Get kids mentally prepared for heading back to school by discussing all of the benefits, such as seeing old friends and meeting new ones and getting involved in activities like sports and clubs. Take the opportunity to discuss the good times they had last year and their new school schedule, including the various classes and activities your children look forward to.
If your summer garden is overflowing with more produce than you can eat (hello,bumper crop of tomatoes!), then you might want to give canning a try. Don’t worry–it’s easier than you think.
Canning fruits and vegetables is a time-honored cooking method that allows you to preserve just about any type of produce and enjoy it throughout the year. The process of canning involves heating foods in jars to high temperatures, which kills microorganisms and drives air out of the containers and creates a vacuum seal.
Here’s how you can get started.
Canning Gear
Safe, effective canning requires the following supplies.
Pressure canner. Also useful as a pressure cooker, this culinary tool provides the safest way to can, as it allows you to heat your jars and their contents to high temperatures. This heavy pot has a lid that locks when the pressure builds in the pot. Many pressure canners come with a cooking/canning rack, which holds the mason jars inside the canner. Quality models also possess dial gauges for accurate pressure control.
Jars and lids. Mason and Ball jars and their two-part lids are designed for home canning and are your best choice.
Canning utensils. Also include in your canning supplies a jar lifter for removing jars from hot water, a jar funnel, which helps you pack the jars, a magnetized lid wand for removing jar lid bands from hot water and clean cloths to wipe down jars and lids.
Getting Started
Wash jars by hand and then sanitize them by boiling them in a large pot of hot water along with the lid rims for 10 minutes. Don’t boil the lids themselves, which are sensitive to heat. Instead, wash them in lukewarm water.
Use the canning funnel to pack the jars with the food you’ve chosen to can. If you are canning fruits such as peaches and apples, cook them beforehand and then add water or syrup when you place them in the jar. Stop filling the jars when you have about ¼ inch between the top of the food and the top of the lid, which is known as the headspace.
Clean the rims of your jars with a clean cloth or paper towel, making sure to remove any drips or crumbs that attached to the rim when you filled the jars. If these particles aren’t removed, they may affect the integrity of your seal.
Place the lids and rims on the jars, securing so that they are finger tight, but not too tight or they may not seal correctly.
Fill the pressure canner with water according to manufacturer directions. Heat the water to boiling and process the jars for the time recommended for the food you are canning.
Remove jars from the pressure canner when the cooking time is up and place them on towels or cooling racks. Wait 12 to 24 hours and then check the seal by pressing down on the center of each lid. The top center of the lid should be concave and not give when you press on it. Or try tapping the lid with the bottom of a teaspoon. A high-pitch sound indicates it is sealed correctly, while a thud means it is not sealed properly.
If you discover that a jar hasn’t sealed properly within 24 hours, you can remove the lid, add a new lid and reprocess.
Label the lids of your jars with the contents and date.
Storage Tips
Canned goods stored in a cool, dry, dark area such as the back of the pantry last for at least a year. Avoid placing the containers near warm areas such as hot water pipes, which will cause the contents to lose quality more quickly.
Now that you know the basics for creating your own canned goods, you can enjoy summer-fresh produce any time of year.
By their very nature, ceiling fans are more than great tools to circulate the air–hanging above your room, they also become focal points of your decor. Here’s what you need to know to choose a model that’s perfect for both jobs.
1. The Fan’s Location
The first question is: Are you using it inside or outside? Most ceiling fans are for the interior, but there are some models designed for outdoor use. Such a model will have a UL damp or wet rating, which means that it can be exposed to the elements without sustaining damage like warped blades.
In- or outdoors, fans should be installed no lower than 7 to 8 feet from the floor. For rooms with low ceilings, that means you’ll need a low-profile or “hugger” fan with a close or flush-mount. That will help keep the fan as high as possible.
On the other hand, high ceilings may call for a ceiling fan with a long downrod (that’s the pole that the fan hangs from), which will bring the fan closer to the floor. Sloped ceilings need special treatment with an angle mount and a downrod.
2. Its Style
The electric ceiling fan was invented in 1882, and today, ceiling fans come designed in just about every style that’s been in vogue since then: traditional, Victorian, Asian-inspired, Mission, Craftsman, and contemporary. There are even theme-specific ceiling fans for children’s rooms.
Another style question you should consider is whether you want your fan to do double duty and serve as a light fixture as well.
3. The Ceiling Fan’s Size
You can find a fan to fit just about any space in the home. The key to selecting the right size fan for a room is to match the room’s dimensions to the fan’s blade span, which refers to the size of the fan from blade tip to blade tip.
A 32-inch fan will cover up to 80 square feet; a 42-inch fan, 80-120 square feet; a 44-inch fan, 120-144 square feet, and a 52-inch fan works well for 144 or more square feet. In rooms larger than 300-square feet, you’ll require two or more 52-inch fans to generate sufficient air circulation. And in very small rooms, the fan should be small enough that the blade tips are at least 15 inches from all walls.
4. How Energy Efficient It Is
Energy efficient ceiling fan models with the ENERGY STAR seal of approval can save 20 percent in energy costs. If the fan has a light that is also energy efficient, it will conserve even more. Most ceiling fans also have a reverse motor feature that allows you to adjust the fan during the winter months so that it circulates warm air.
5. How You Turn It On and Off
Rather than operate with pull cords like older ceiling fans, newer models generally feature wall controls that enable you to turn the fan on and off and adjust its speed. Some fans also have a remote control that allows you to make adjustments from anywhere in the room.
Now that you’re armed with all of the facts regarding buying a ceiling fan, you can choose the best model for keeping you cool and comfortable.
When the sun sets and a chill descends over the back yard, you don’t have to rush indoors. If you had an outdoor fireplace, you could just hang out by a backyard fire instead.
An outdoor fireplace makes it easy to warm up and enjoy the drama of open flames in the great outdoors. You can even use it to enjoy tasty favorites like toasted marshmallows for s’mores too. Ready to buy one? Here’s what you should consider.
1. What it burns. Most outdoor fireplaces are designed to burn wood, but some have hidden built-in propane tanks that allow you to enjoy the warmth without worrying about stoking the fire.
2. What it’s made of. Outdoor fireplaces come in several materials, including high-temperature-rated steel, which is attractive, sturdy, and long-lasting. Cast-iron is durable, but be aware that it can rust. And while aluminum models stand the test of time, they may not hold up in the looks department. Copper fireplaces start out shiny and attractive, but will green and tarnish after just a few uses, so be sure that you like that patina if you go the copper route.
3. Its capacity. The larger the fireplace bowl, the more wood you can burn, and the warmer your toes will be. Unless you have a small space to heat, opt for a fireplace that can burn at least two to three logs or pieces of wood at once.
4. Safety considerations. Open flames bring potential danger, so it’s important that you choose an outdoor fireplace that is enclosed, or features an effective sparks-cover or screen. If the one you’re considering doesn’t have a screen, buy one separately.
5. Whether it has a cover. Protect your outdoor fireplace from the elements and prolong its life by choosing one that also offers a custom cover.
Do you have a favorite way to warm things up while you stargaze?
Dining alfresco is one of my favorite things to do in the summertime: With Mother Nature as a backdrop, food just seems to taste better and conversation is relaxed and flows more smoothly. And although having a meal outside is usually a more casual experience than a dinner party indoors, that doesn’t mean it’s less special. In fact, with the right set-up, it can be downright magical.
Here’s what you need to create an outdoor table with a great vibe for celebrating good food, friends, and family.
Since candles are the ultimate mood-setter, including them on your table is a no-brainer.
Of course, using candles outdoors requires special care: They need to be sturdy, and heavy enough not to tip over easily. They should also have enough protection from the wind that they won’t blow out in breeze. That makes lanterns a great candle option. Use a single lantern if you’re dining as a couple, or group several on the table if you’re hosting a larger group.
For the safest flicker, of course, you can always opt to use flameless candles on your table.
Adding linens elevates the dining table from a basic picnic to certified-event status. And there are so many options for table coverings beyond your basic gingham: You might choose a fiesta-bright tablecloth in a vinyl or a durable indoor-outdoor material, but, weather permitting, you don’t have to: You can also bring out a traditional tablecloth for a more romantic feel. Or layer your old-faithful vinyl outdoor tablecloth with pretty place mats for a more bohemian vibe.
Dishes
Pictured: Oenophilia Greenophile™ 100% Sugar Cane Entertainment Plate, Zak Designs® Urbana Melamine Dinnerware, Reactive Dinnerware Collection. Zak Designs® Fronds Melamine Dinnerware
Outside, you can choose any dishes you want–from eco-responsible sugar-cane plates to easy-care melamine dishes (which can have a more refined look than you might imagine), right up to stoneware or your wedding china (not advised if you’re hosting an event with kids and/or rambunctious pets around!).
Your goal is to choose a few pieces that really match the mood you’re trying to set, whether it’s whimsical or completely sophisticated. That might mean a free-wheeling luau look, an exotic abundance of floral style, or clean, bold stoneware.
Nothing kills a laid-back mood faster than being forced to run in and out of the kitchen half-a-dozen times for food or drink refills. Make things easier–and give the table’s set up a little flair–with servingware that fits with the meal and your menu.
You can also serve water and drinks like lemonade in clear drinkware sets that include a serving pitcher. And rather than offering guests mixed drinks, wine and champagne in plastic glasses, serve in style with a worry-free shatterproof glassware collection.
Now all that’s left to add is a few friends, a fun menu, and some tunes. Enjoy!
Julie Bawden-Davis
What do you use to make an outdoor table where guests will linger well past the final course?
June is Adopt-a-Cat Month, and we’re marking it by sharing some of our favorite cat toy ideas.
###
I’m not ashamed to admit that my cat, Junebug, was my first child. I rescued her many years ago before I brought my (now-teenage) human children into the world. When I went on a mission to find Junebug the perfect toy all those years ago, I only discovered catnip-stuffed mice.
Since Junebug was special (of course), she didn’t like catnip, so she turned up her nose at my find.
How things have changed: When I admire today’s array of cat toys, I’m amazed by the variety of feline entertainment available. So much so that I imagine it can be tough for a new cat-owner to choose the right ones.
That’s where we come in.
This list outlines the elements of great cat toys, so that you can choose the toy that’s best suited to your one-of-a-kind cat.
I’m sure that Junebug would approve.
Feature #1: It’s Elusive
Cats are naturally curious–even more so when something seems to be just out-of-reach. Toys that make your cat stretch, jump, and seek are sure to keep her occupied until she drops into a heap of exhaustion.
Laser cat toys (the pet version of laser tag?) are especially popular with felines—and they have the added bonus of entertainment for you, as you can watch your kitties scurry and pounce. Some are automatic, so you can set it on the floor and watch the fun; others are handheld.
Feature #2: It’s a Challenge
Toys that spark your cat’s natural inclination to stalk and hunt are sure to keep her mentally stimulated and happy.These peekabo toy boxes let you hide a ball or other object for your cat to seek.
Another great options is s remote control mouse. For best results, and to prevent feline frustration, use remote control toys on even surfaces in areas that give your cat plenty of prowling room.
Feature #3: It Offers Variety
Prevent kitty boredom from turning into naughtiness by providing cat toys that offer plenty of alternatives for fun. A kitty version of a baby activity mat gives your feline friend numerous chances for amusement, including textured areas for clawing, refillable catnip pouches for sniffing, and snap-on toys for batting and biting fun. And when she’s sufficiently worn herself out, she can curl up on the mat and take a snooze.
Feature #4: It’s Unpredictable
Cats perk up when something unexpected happens, and today’s electronic cat toys allow you to surprise kitty. Powered cat mobiles with timers, for instance, enable you to set pre-scheduled play sessions throughout the day. Kitty may be snoozing but will rouse immediately when a beep announces that a play session is about to begin.
Feature #5: It’s Interactive
Cats like to get an immediate response. Introduce toys that react when kitty takes a swat by swinging, hopping, rolling or making noise. Your cat will be delighted, for instance, when she smacks a kitty ball and it rolls across the room, and even more pleased when it responds by ringing a bell or spitting out a treat.
Feature #6: It Involves You
If you find that a cat toy entices you to get down on all fours to play, chances are that your cat will be that much more delighted (although she’ll never admit it).
It’s that time of year: You’re hankering for summertime classics–juicy burgers, sizzling steaks, or tender ribs–but what you reallywant is to enjoy that smoky goodness from your own backyard. Ready to give it a try? Achieving outdoor-chef bliss at home is possible, if you have the right equipment. These hot tips can help you choose the gear you need to get those outdoor flavors at home.
First Question:
Before we go any further, let’s clarify. While both grilling and smoking are great techniques, they are not the same thing. When you grill, food is cooked quickly–at a high temperature–over a heat source, such as hot coals or gas-powered flames. Grilling proponents claim that rapid cooking creates a nice sear on the meat, which locks in flavor and keeps it juicy. It’s ideal for foods that benefit from the flames: steaks, burgers, chops, chicken, fish, shrimp and vegetables can all be deliciously grilled. In smoking, on the other hand, meat is cooked more slowly and at a lower temperature, by exposing it to smoky, heated air — “low and slow” in smoker parlance. Fans say smoked meat has a totally unique, rich flavor, and that slow-cooking breaks down toughness in larger cuts of meat, leaving it especially tender. This is ideal for cuts like brisket, ribs, and pork shoulder, but can also impart great flavor to other foods like turkey or lamb. Many foods can be cooked either way, depending on the desired end result. You can slow cook (but not necessarily smoke) on most grills, but you can’t grill on most smokers.
If You Want A Grill…
First, think about the type of grill you’d prefer:
Charcoal grills are economical and easy to use, and they impart an unmistakable “char-broiled” flavor to your food. In a charcoal grill, briquettes are lighted by hand and smolder at a high temperature. It can take a bit of time to prepare the coals for cooking, however. (Some advanced models do have gas ignition systems to help speed up the process).
Propane gas grills and natural gas grills start with the flip of a switch and heat up quickly. Some models even have controls that allow you to cook foods at more precise temperatures. Most operate with a canister of fuel that you purchase and refill, though some can be connected to home gas lines. Many models also feature side burners and rotisseries that allow you to prepare multiple items at once.
Electric grills, which you plug into an outlet, also start up right away. They tend to come in small units that work well for tighter spaces, such as apartment patios and balconies. Some models feature ceramic briquettes, which add barbecue-style flavor.
Next, determine the size of grill you need. First, determine how much cooking area you need. Cooking area is the actual space you’ll have available for burgers, steaks, or whatever’s on your menu. Too large, and you’ll waste fuel and time heating surface you won’t need. Too little, and you’ll spend all day flipping little batches of burgers at the family picnic. The other thing to consider is the amount of space you have for storing your grill. Get one that will cook what you need, but that won’t take over your entire outdoor space.
If you want a smoker…
There are many types of smokers. There are small units appropriate for smoking small batches of food, drum-style units and large smoker rigs perfect for a block party. As their name suggests, bullet style units are shaped like a bullet, while cabinet-style smokers open like a small refrigerator. All smokers have interior racks where you set the meat, drip pans and a heat source.
Electric smokers are fueled by–wait for it–electricity. That makes it easy to keep them at the low, consistent temperatures required for smoking. To get the smoke, you add wood chips to a heating chamber.
Propane smokers also do a good job at keeping the correct temperature, though they’re fueled by propane that you’ll buy in tanks. These smokers are portable, so you can take them on camping trips. (But if you do, remember: Since smoking takes some time and running out of fuel is no fun, it’s best to have an extra propane tank on hand.)
Pellet smokers have a system that automatically feeds wooden pellets into a burn pot that generates the required heat and smoke.
Charcoal smokers rely on charcoal to create heat and smoke, and are the best at delivering an authentic smoky flavor to food. It can be difficult to maintain a consistent temperature with charcoal, however, and you often have to change the charcoal several times during the smoking process.
Experiment and have some fun, and you’ll be the neighborhood grillmaster (or smokemaster) in no time!
Tell us about your adventures in outdoor cooking–do you have a juicy grill or smoker story to share?
Do you know what you should do just as soon as you’ve shipped off that tax return?
You should shred all the paper that you no longer need. Okay, maybe it’s not as exciting as a celebratory glass of champagne, but it is a great way to protect your financial and personal data: Use a good shredder, and you can feel confident that your personal information won’t wind up in the wrong hands.
We can help you choose. Before you buy a shredder, make sure you know these five facts:
1. How you’ll store it
There are shredders to fit almost any space, from small, desktop models to larger, wastebasket-sized, shredders. If you’ll use it often, consider a freestanding model that you can leave out for easy access. Don’t worry that it will be an eyesore: Shredders come in various colors and styles, making it possible to choose one that fits your home’s décor. If you’ll use it rarely, it might be easier to get a model that you can store in a drawer or on a shelf.
2. Its cutting method
The most important consideration when choosing a shredder is the machine’s cut-style, a.k.a, the exact way it shreds a piece of paper.
Cross-cut shredders are the most common. These models slice the paper both vertically and horizontally creating small, rectangular pieces that are difficult to piece back together.
Need extra security? Choose a micro-cut shredder, which takes the idea of “little pieces” to a whole new level. A micro-cut shredder cuts an 8 ½ x 11 piece of paper into approximately 3,000 pieces.
Strip-cut shredders (the ones that cut paper into spaghetti-like strips) are less common than they used to be, because they don’t provide the same level of security as a cross-cut or micro-cut — the strips they create are too easy for bad guys to paste back together.
3. Its capacity
Determining how much, and how often, you’ll have things to shred will help you decide how powerful a shredder you need.
A shredder’s product listing will indicate how both how many pages you can shred in a day, and how many pages you can shred at one time. In general, light usage in the average household is around 50 or fewer sheets a day. Shredders designed for this load can usually handle from 4 to 12 pages at one time. If you will be shredding more, look for a model that can handle a higher volume–because going over the recommended capacity can burn out the shredder’s motor.
Of course, you should consider what you are shredding as well: Make sure that the opening of any shredder you’re considering is large enough to accommodate the size of paper you’ll shred, and if you want to shred items like credit cards and CDs, double-check that the machine can handle those materials.
4. How jam-resistant it is
Paper jams interrupt shredding and can sometimes be difficult to untangle, so look for features that will help you avoid them: Some models sense when the paper is too thick, and will turn off before a jam occurs.
5. How easy it is to check its status
And while it’s hardly required, another great tool is an auto button. This will let you keep the machine on but not running, which saves you from having to turn the shredder off and on as you ready paperwork for shredding.Waiting until the shredder is stuffed can lead to jams and overheating, and makes for messy emptying. To avoid overstuffing, look for shredders with a clear shredder compartment or a window into the machine — some even feature an indicator light to let you know when the compartment is reaching capacity.
Once you know what you need in a shredder, finding the right one for you is easy.
Julie Bawden-Davis
Kids and rain can be a rough mix. If April showers are falling and singing “Rain, Rain, Go Away” is beginning to wear thin, fear not: We have a dreary day plan of action. The following rainy day activities will keep the TV (and the whining!) off for hours.
Get Crafty
There are craft kits for kids for almost every interest and skill level. You can (clockwise, from top left):
Rainy days are perfect for trying out new crafts
Use a stamping kit to make cards and bookmarks for friends and family.
Mold one-of-a-kind clay creations(you get bonus points for pinning photos of your best sculptures on Pinterest!).
Make wearable art by knitting it or making your own jewelry.
Build your own log cabin with real wood at home.
Play Games
The best way to have fun with games it to think beyond the basic board. Here are some of our favorite ideas (from left): Think beyond the board for game-time fun.
Play show and tell: Let each person explain and share their favorite game — (ours is the new sensation Pallina).
Have a puzzle contest to see who can complete their puzzle, like this Safari one, the fastest.
Or create your own board game and test it out. You’ll need some oversized paper and crayons or markers. using poster board. You and the kids can draw out the stages of the game on the poster board, make game pieces out of clay and print out paper money.
Dress-up and Make Believe
Dressing up is a super way to spend a rainy day. Both girls and boys love dress up and make-believe. You can buy a costume, but you certainly don’t have to: Plan ahead for rainy day fun by visiting the thrift store and stocking up on old clothing, shoes, hats, wigs and costume jewelry. Or just let them dress up in your clothes for a giggle.
Make Homemade Treats
Make your own cotton candy? Sweet! Get out your favorite and pick out some recipes for tasty items like cupcakes, cookies, bars, and pies. You could even make cotton candy.
With indoor fun like this, it won’t be long before the kids are hoping to be “trapped” inside.
Do you have any fun rainy day activities that you and your kids enjoy? Share them in the comments section below.
While small rooms have their benefits, including coziness, when the square footage is limited it can feel like the walls are closing in. Decorating a small room so that you’re opening a small space up and making it look bigger is possible–if you keep a few design strategies in mind.
“A Friend Is” Wall Art
1. Go vertical
Raising the eye up to the ceiling gives the illusion of grandeur and depth. Give it a try: Hang a vining plant in the corner of the room, which will draw the view up. You could also hand long, vertical artwork starting near the ceiling or include some decorative pendant lighting.
2. Break up the space
Creating “rooms” within the room gives a sense of square footage. Create permeable “walls” by hanging sheer curtains or beading from the ceiling, using decorative room dividers and thin shelving units to mark out areas of the room.
3. Consider color
Lighter colors tend to open up a space, while darker hues give a closed-in look. Opt for mellow colors like yellow, beige, white, pale green, and pink on the walls and accent trim with darker colors. If such a color scheme isn’t appealing and you prefer more vibrant colors on the walls, alternate between light and dark.
4. Watch the ceiling
While lighter hues do make a room look larger, it’s not necessary to go with all white walls. Instead, focus on the color of the ceiling. By painting the fifth wall white or off-white you create the appearance of a raised ceiling no matter what color the walls are.
5. Avoid clutter
Excessive odds and ends make a space seem small and stuffy. Edit out knick knacks, sticking with a few treasured possessions and keep the center of the room open and free. Avoid furniture that attracts clutter like coffee tables. Put paperwork and items like remote controls in drawers.
6. Replace wall-to-wall carpeting
Carpeting has a way of closing in a space and making it seem claustrophobic. Opt for wood, large tiles, or stained concrete, instead, and add an area rug if you want to add color or soften things up.
Linon Home Zuma Short Back Storage Bench
7. Use low-lying furniture
Low, long pieces of furniture (like this one) keep wall space open, which gives an illusion of more space. Avoid tall, hulking items like large bookcases and cabinets, which can dwarf a room. If you choose to use a tall furniture item, opt for a piece that is thin depth-wise and paint it the same shade as the walls.
8. Capitalize on lighting
Let in as much natural light as possible during the day. At night, task lighting that illuminates a small portion of the room and washes the rest of the space into darkness adds depth to a room. Also equip overall general lighting, such as a ceiling-mounted fixtures, with dimming capability.
9. Think multi-functional
Use furniture pieces that do double-duty. Opt for beds with drawers underneath, ottomans that offer storage and seating for guests.
10. Install shelving
Rather than bulky bookcases or storage cabinets, hang wall shelving. Paint the shelves the same color as the walls and they’ll blend in and keep the space open.
Two’s Company® Paris Mansion™ Antiqued Gold Wall Mirror
11. Use mirrors
Reflecting various areas of the room gives the illusion of space multiplied. Place wall mirrors in a location where they will reflect an attractive view, such as the outdoors or a piece of art.
12. Go light on window treatments
Heavy drapes or bulky shutters make a room look smaller. Opt for sheer curtains or window shades and for a decorative flair, choose simple valances.
Now that you’re armed with these small space design tricks, you can make your room look like a palace.
What’s your favorite trick for making your room look bigger?
Julie Bawden-Davis
As a lifelong allergy sufferer, I’m well aware that windows, with their direct access to the outdoors, can have a significant impact on symptoms. Fortunately, it is possible to allergy proof your windows–if you keep a few tips in mind.
Open or Closed?
If you suffer from allergies, you don’t always have to have the windows closed … just most of the time, unfortunately.
Close your windows during warm weather and use air-conditioning, especially when humidity is high. Also keep windows shut when conditions are damp: Moisture sends mold spores into the air, which causes symptoms for many allergy sufferers. Because grasses, trees and weeds tend to pollinate during the early morning hours, keep windows closed at this time until mid afternoon. Also, avoid sleeping with the windows open.
Open your windows from the mid-afternoon until before you go to bed if the humidity is below 50 percent outdoors. As an extra precaution, you can install pollen-proof screens, which have especially small openings that prevent more than 90 percent of common plant allergens from getting inside your home.
Keep it Clean
Dirty, dusty windows are a breeding ground for allergy causing dust mites. Dust is particularly prone to building up on flat surfaces such as the windowsill. Keep the windows allergy-free by regularly damp-dusting with a 5-percent bleach solution. The will rid the area of mites and mold spores, and the damp cloth will prevent the dust from flying into the air and irritating you. For extra protection, wear a dust mask when cleaning windows.
Hang Allergy-Resistant Window Coverings
Dust-catching window coverings, such as heavy drapes and blinds with small slats that are hard to clean, are notorious breeding grounds for dust mites. Better choices include window shades and blinds or shutters with large slats that can be easily vacuumed. Clean blinds, shutters and shades weekly with a vacuum that features a high-efficiency particulate air (HEPA) filter, and damp clean them once every three to six months.
A nearly allergen-free window covering option is privacy window film. Apply this directly to the window, which gives it a frosted look. It also reduces glare and UV rays.
If you must hang curtains, choose lightweight fabric that is washable. Washing the curtains in hot water every three months will keep them from building up dust mites.
It can be a lot of effort, but try these allergy fighting tactics with your windows, and with luck, you can prevent many allergens from getting inside and making your miserable. Avoiding the sneezing and sniffles is definitely worth the effort.
Julie Bawden-Davis
What household tricks have helped you with your allergies? Tell us below!
While you can get away with wearing un-pressed clothing sometimes, a crisply ironed wardrobe always looks best. Depending on the item and the occasion, whipping out the iron is sometimes mandatory. Knowing how to iron different garments makes it easy to get great results.
Consider these steps for wielding an iron with flattering results.
Have a Good Ironing Board
First thing’s first: To iron well, you must have a sturdy, smooth ironing surface. These days there are many to choose from, including stand-alone models, wall-mounted, hideaways … even a roll-up ironing board. If you’ve got a standard ironing board, make sure it has a smooth ironing board cover to go over it.
Fill the Water Reservoir
Top off the iron’s tank with distilled water. Avoid using tap water, which tends to be high in minerals that cause build-up on the iron’s metal bottom, which is known as the soleplate. Such mineral deposits can stain your clothing during ironing.
Determine the Proper Setting
Figuring out what type of material the clothing item is made of will help you determine the right setting to use. The correct setting is important, as an iron that is too hot will burn material and one that is too cool won’t press out wrinkles. Clothing tags generally tell you the material type, such as cotton, and you can then find a corresponding setting on the iron.
Preheat the Iron
The iron is ready when steam is released after you press the steam burst button. This is a button usually located on the handle of the iron that causes the release of steam when you press it. Use this feature to remove stubborn wrinkles when ironing.
How to Iron a Shirt
An easy way to remember how to iron shirts is to think “neck down.” Work from collar to shoulder to cuffs to the body of the shirt. Follow these steps.
Iron the underside of the collar with smooth, even strokes, working from the center out to each end. Flip the collar over and iron the topside in the same manner.
Slip a shoulder of the shirt into the thin end of the ironing board. Iron from the shoulder to the center of the back and repeat with the other arm.
Iron the underside and then outside of cuffs.
Place each sleeve cuff side up on the ironing board and iron until smooth, repeating on the other side.
Iron the body of the shirt, beginning with the front and ending with the back.
How to Iron Slacks
Most pants look best if ironed. Follow these steps:
Turn the pants inside out and iron all seams so they lay to one side.
Turn the pants right side out and iron any existing pockets flat.
Work on the upper portion of the pants by fitting the waist of the pants around the thin end of the ironing board. Rotate the waist around the board until you’ve ironed all sides. If there are pleats in the front of the pants, pinch them with your fingers while ironing.
Lay the pants flat with both legs on top of one another, lining up the inseams. Lift up the top pant leg and iron the inside of the bottom leg, then put down the top leg and iron it. Flip the pants over and repeat the procedure on the other side.
How to Iron Skirts
Place the skirt over the small end of the ironing board and starting from the bottom of the skirt, iron up to the waistline, rotating the skirt as you work.
Caring for Your Iron
Keep your iron free of debris and harmful mineral buildup by cleaning the machine after every fourth use, or when the iron no longer glides smoothly over clothing. Clean the iron’s soleplate with a cotton ball dipped in vinegar and use vinegar-soaked cotton swabs to clean out the steam vents — always when the iron is unplugged and completely cool, of course.
To rinse out the interior of the iron, fill the tank with a mixture of half vinegar and half water, heat the iron and flush the system over the sink by pushing the steam-burst button until the iron is drained.
Store your iron free of water in an upright position.
Now that you know the basics of ironing, start pressing and impressing.
Julie Bawden-Davis
As a writer (read: someone who works from home), I know as well as anyone: An organized home office with sufficient storage space leads to a productive and pleasurable work environment. Here’s a rundown of the tools to consider for optimal home office organization.
The Right Desk
As your central locus of work, your choice of desk is important to providing you with adequate storage and keeping you organized.
First, consider the outside: Besides choosing a desk that is aesthetically pleasing, look for a piece of furniture that is right for the way you work. For instance, if you need a lot of flat, work-surface area, get a desk with some depth. You might even consider one with a return (that’s an l-shaped desk), which will give you even more space. If you only need lots of space once in a while, consider a desk that has a movable work-space, such as a cabinet with wheels, that can be pushed under the desk or out of the way when you don’t need it.
Then, look inside at the storage space offered within the desk. If you need to store office supplies and other items, look at desks with a variety of drawers in different sizes and dimensions, such as a location for pens, pencils and scissors, and another size drawer where you can store files.
Good Organizers
Drawers and cabinets filled with a jumbled mess waste space and create chaos. You can choose from a huge range of organizing tools, which come in a wide variety of sizes and dimensions. There are single-item organizers, as well as complete drawer models that allow you to segregate items and create a space for everything. Some are also expandable.
Cabinet organizers help to create additional space and organization in cabinets. Such systems are often also removable, which makes it handy when you want to transport items.
When space is at a premium in the home office, try space-saving storage items like bench storage units and ottomans with storage space built in.
Cord Control
Electronic equipment such as computers, scanners, printers and cell-phone chargers bring what can seem like an overabundance of cords and cables. A variety of cord control products on the market allow you to collect the cords and store them in an unobtrusive manner. Such systems also allow you to easily unplug items without having to sort through all of your cords and cables.
Sorting tools
The key to organization in the home office is to stay ahead of clutter–which can be a tall order. Start by planting a trash can next to your desk, so you can throw unwanted junk mail and paperwork out right away, instead of stacking into ever-growing piles for future disposal.
And speaking of disposing, you might consider a shredder to safely dispose of records, receipts and other documents that could put you at risk for identity theft.
Sorting tools such as letter trays, magazine racks, desktop mini filing systems and stackable storage bins also give you a place to put items as they come in for sorting later, rather than creating a pile that becomes unwieldy and difficult to organize.
Storage bins
If you have a lot of items and limited drawer or cabinet space, storage bins work well for organizing. There are storage bins in various shapes and sizes, making it possible to find the right size and shape for your situation. You can save space by opting for stackable storage bins and units. Keep these storage and organization tools close at hand, and you can enjoy a well-run home office that rivals any business.
Julie Bawden-Davis
Tell us: What’s your biggest home office organization issue?
We know, we know: Creamy is dreamy when it comes to comfort food. And sure, macaroni and cheese, pot pies, and ice cream are awesome. But they’re also hard on the waistline, which means these soothing dishes aren’t doing much to help you keep your healthy resolutions.
The good news: You can tweak your favorites with a variety of handy kitchen gadgets and low-fat substitutions to make them whole lot healthier. Try these tips and enjoy some of your classic favorites–without the guilt.
Ice Cream
Make a lower-fat version of ice cream using the Yonanas™ Ice Cream Treat Maker. This kitchen gizmo transforms frozen bananas and other fruit into a low-calorie, nutritious, and creamy treat that actually tastes like soft-serve ice cream. Since Yonanas uses only frozen fruit, the “ice cream” contains zero fat and cholesterol, plus it’s loaded with fiber, vitamins, and minerals.
Macaroni and Cheese
There’s a formula for duplicating thick, rich mac n’ cheese with a low-fat alternative: Cut back on the cheese by 40 percent to 50 percent and replace it with creamy ingredients like low-fat cottage cheese. Make it even healthier by using using 1% milk and whole-wheat pasta. If you want more of that yummy, crispy crust on your M&C, try baking servings individually in small stoneware bakers.
Chicken Pot Pie
With its thick, flaky crust, chicken pot pie is traditionally high in fat and calories. You can cut the fat by adding extra veggies, including peas, carrots, and mushrooms and by using low-fat chicken breast combined with low-fat chicken broth. Top the filling off with a 6-layer topping of phyllo dough brushed with olive oil, which creates a luscious crispy coating during baking.
Fried Chicken
This typically deep-fried ultimate comfort food responds well to the low-fat cooking technique of baking. Create a low-calorie version of the well-loved crispy coating by combining breadcrumbs, black pepper and garlic salt mixed with a small amount of olive oil. Coat a baking sheet with cooking spray and bake the coated chicken pieces in a hot oven.
Pudding
With its rich, creamy texture, pudding tops the charts of classic comfort foods. Try making sugar-free instant pudding with non-fat milk, and give the low-calorie pudding a delectable velvety texture by mixing it in a blender at high speed.
Cheesecake
Rich, tempting cheesecake can be transformed into a low-fat version by replacing half of the whole eggs with egg whites, substituting low-fat cottage cheese for cream cheese and using a light graham cracker crust.
Chocolate Cake
Make a dense, moist chocolate cake or cupcakes using pumpkin! Replace the eggs and oil in the recipe on the cake mix box with a 15-ounce can of pumpkin (not pumpkin pie mix!). It reduces the amount of fat and calories, and adds fiber, vitamin A, and antioxidants. You won’t taste the pumpkin; just a moist, chocolatey cake.
Did we miss your favorite comfort food? Tell us about it below!
When it comes to bath time, parents and children have different agendas. Your first order of business might be getting your child squeaky clean, but the kids? Well, they just want to have fun. You can both get what you want–if you use these easy kids’ bath time tips for all ages and stages.
Infants
Establishing a pleasant bathing routine sets the stage for your little one’s bath time attitude. For newborns and infants, the goal is to create security and comfort — for both of you. One way to do that is to place your baby in a snugly wrap that envelops him or her during bathing (these come as either a removable part of the baby bath or as separate bath wraps). Another way to keep things comfy is by using an attachable sink hose-end sprayer that features a gentle setting. And make sure to wrap your baby in something soft when you’re done, like a terrycloth towel or towel apron that keep you dry and your baby warm and snuggly.
Toddlers
Toddlers are becoming more aware of their surroundings, and they’ll enjoy exploring and playing at bath time with your help. Many infant baths convert for toddlers, allowing your little one to sit up when he’s ready. When it’s time to move into the big bathtub, make sure he or she stays secure and happy by using a non-slip bathmat in the tub.
This is the time to introduce some fun in the bath. Look for floating, squirting rubber bath toys, from the classic duckies to hippos, boats, and cars to elicit squeals of sudsy laughter.
Preschoolers
Provide fun activities and bathing may become your preschooler’s number-one favorite pastime. Now that your child has more developed fine motor skills, you can introduce a wide variety of bath toys, including tub crayons, which allow him to do freely what you’ve told him never to do—write on the walls. Mini squirt guns are also fun—especially if you have more than one little one in the bath.
Easily gather, rinse and hang to dry all of your child’s toys once the bath is done with a bath storage basket.
Grade-schoolers
The grade-school years offer more opportunities for bath time fun, from scented, colored bath fizzies that effervesce in the water, to actual bathtub games like ring toss and paddle ball. You can add an educational twist to the experience with wet-and-stick foam letters and shapes that stick to the bathtub wall, encouraging your child to spell words and create imaginary scenes with animals, such as dinosaurs. Waterproof bath books allow your child to practice her reading skills. Your kid can also play “house” in the bathtub with items like bath-time dolls and tea sets.
Now that you know the secrets to bath-time fun for kids, fill up the tub and let the splashing begin.


 A well-stocked bathroom promotes a pleasant stay and saves your guests from the indelicate task of having to ask you for toiletry items — and saves you from running around looking for that extra toothbrush you brought home from the dentist’s office. Supply the bathroom with fluffy towels in several colors so that you and your guests can color code and easily keep track. If you’ll be hosting young guests, invest in a collection of inexpensive towels and washcloths in fun, festive colors. If you provide a pop-up laundry hamper, you can hope that they might actually use it, so you won’t be finding piles of damp towels in the corner.
Avoid the inevitable clutter that occurs in the bathroom with a full house by providing your guests with a shower caddy they can carry to and from their room loaded with bathroom necessities such as inexpensive toothbrushes, toothpaste, mouthwash, a hairbrush, sample-size shampoo and conditioner, soap, lotion, disposable razors and shaving cream.
Also make sure that the bathroom is well-stocked with necessities like toilet paper, tissue and a hairdryer.
A well-stocked bathroom promotes a pleasant stay and saves your guests from the indelicate task of having to ask you for toiletry items — and saves you from running around looking for that extra toothbrush you brought home from the dentist’s office. Supply the bathroom with fluffy towels in several colors so that you and your guests can color code and easily keep track. If you’ll be hosting young guests, invest in a collection of inexpensive towels and washcloths in fun, festive colors. If you provide a pop-up laundry hamper, you can hope that they might actually use it, so you won’t be finding piles of damp towels in the corner.
Avoid the inevitable clutter that occurs in the bathroom with a full house by providing your guests with a shower caddy they can carry to and from their room loaded with bathroom necessities such as inexpensive toothbrushes, toothpaste, mouthwash, a hairbrush, sample-size shampoo and conditioner, soap, lotion, disposable razors and shaving cream.
Also make sure that the bathroom is well-stocked with necessities like toilet paper, tissue and a hairdryer.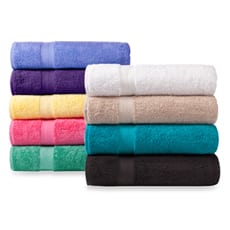
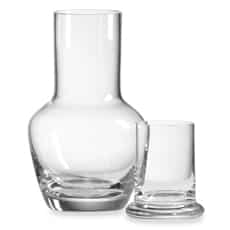 Chances are you’ll feed your guests, but it’s also nice to leave a few snacks and water in the room so that they don’t have to worry about waking up the house in the middle of the night if they get thirsty or hungry. Stock the room with glass canisters filled with nuts, dried fruit and crackers. Water bottles work, but a decorative carafe is more economical and environmentally friendly.
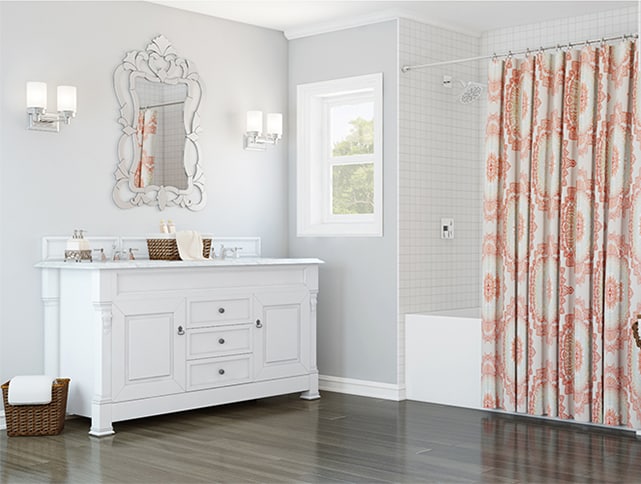
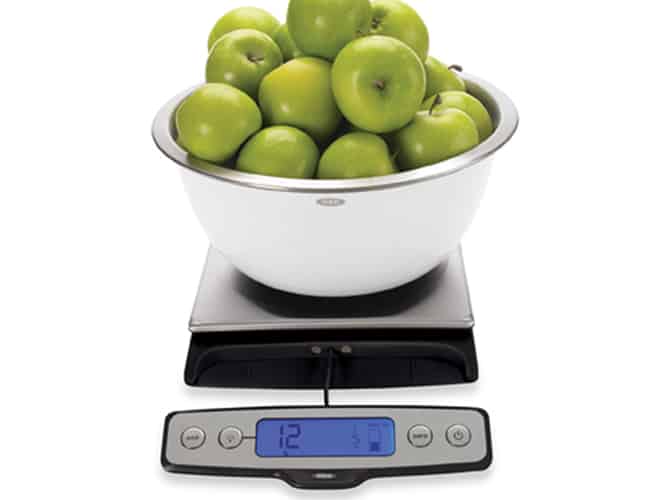
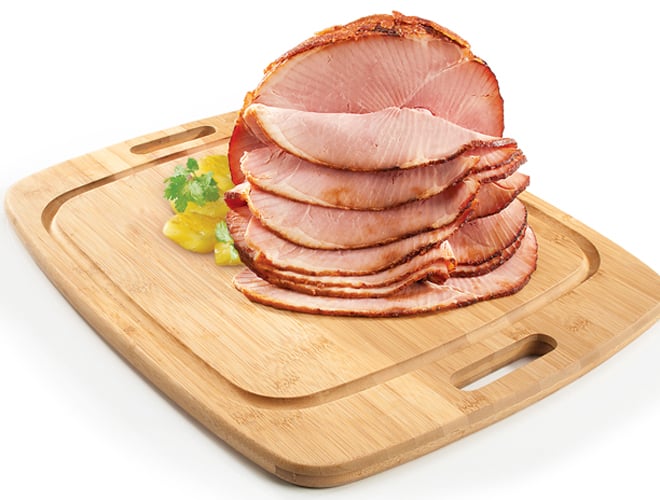

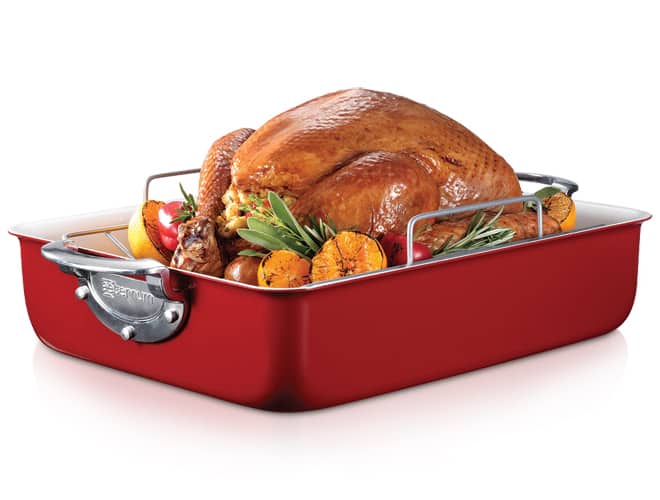


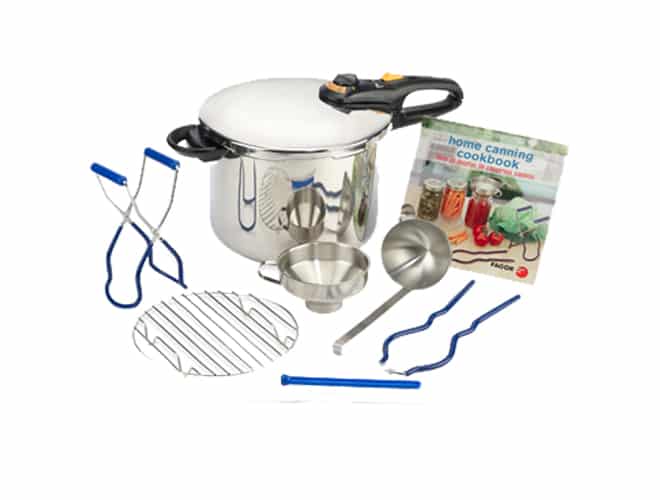
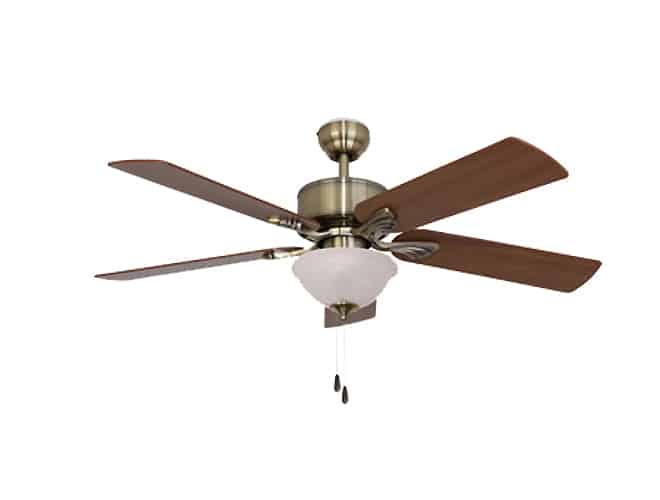

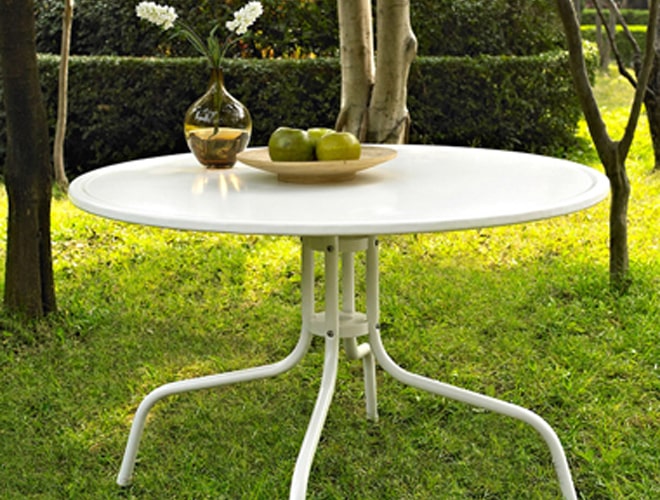
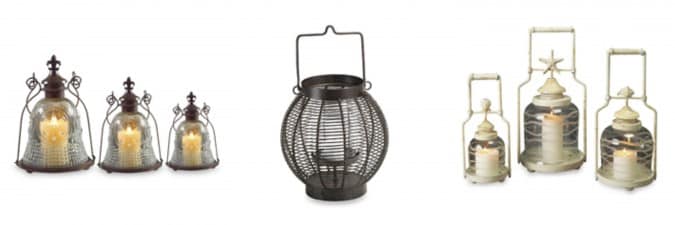
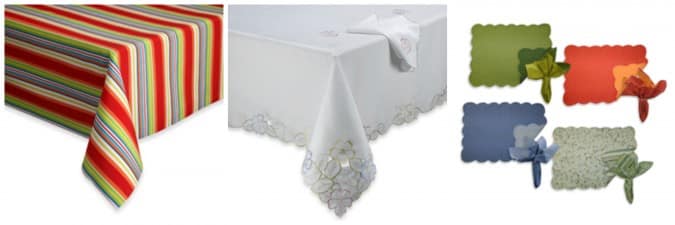
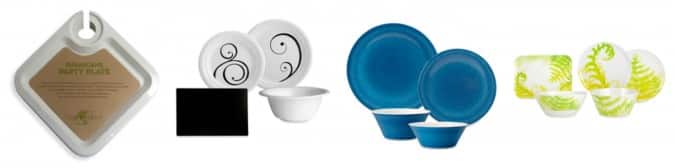 Pictured: Oenophilia Greenophile™ 100% Sugar Cane Entertainment Plate, Zak Designs® Urbana Melamine Dinnerware, Reactive Dinnerware Collection. Zak Designs® Fronds Melamine Dinnerware
Outside, you can choose any dishes you want–from eco-responsible sugar-cane plates to easy-care melamine dishes (which can have a more refined look than you might imagine), right up to stoneware or your wedding china (not advised if you’re hosting an event with kids and/or rambunctious pets around!).
Your goal is to choose a few pieces that really match the mood you’re trying to set, whether it’s whimsical or completely sophisticated. That might mean a free-wheeling luau look, an exotic abundance of floral style, or clean, bold stoneware.
Pictured: Oenophilia Greenophile™ 100% Sugar Cane Entertainment Plate, Zak Designs® Urbana Melamine Dinnerware, Reactive Dinnerware Collection. Zak Designs® Fronds Melamine Dinnerware
Outside, you can choose any dishes you want–from eco-responsible sugar-cane plates to easy-care melamine dishes (which can have a more refined look than you might imagine), right up to stoneware or your wedding china (not advised if you’re hosting an event with kids and/or rambunctious pets around!).
Your goal is to choose a few pieces that really match the mood you’re trying to set, whether it’s whimsical or completely sophisticated. That might mean a free-wheeling luau look, an exotic abundance of floral style, or clean, bold stoneware.
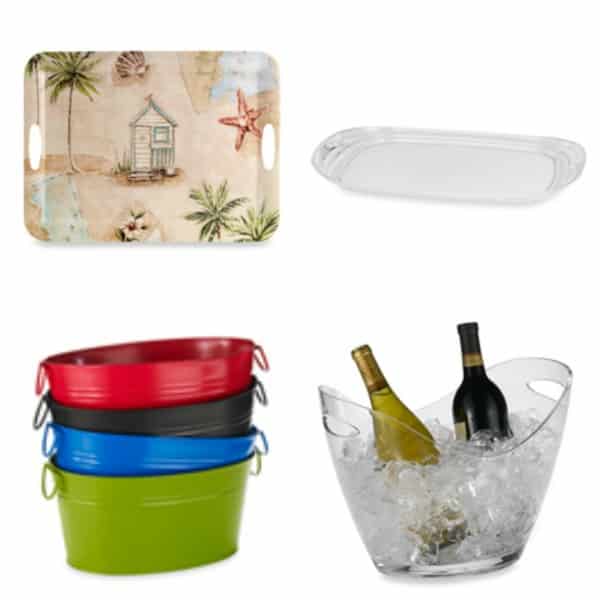

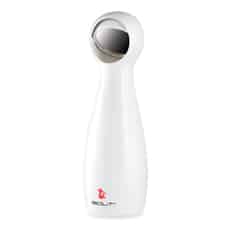
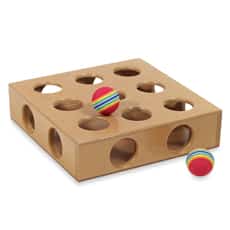

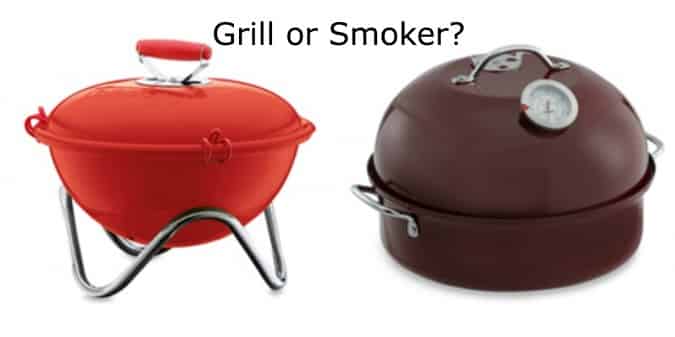

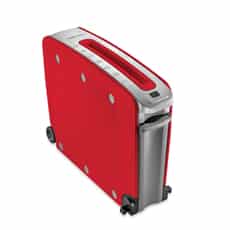
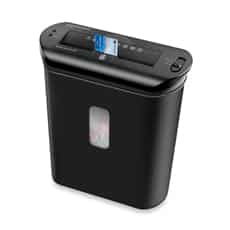 And while it’s hardly required, another great tool is an auto button. This will let you keep the machine on but not running, which saves you from having to turn the shredder off and on as you ready paperwork for shredding.Waiting until the shredder is stuffed can lead to jams and overheating, and makes for messy emptying. To avoid overstuffing, look for shredders with a clear shredder compartment or a window into the machine — some even feature an indicator light to let you know when the compartment is reaching capacity.


 Dust-catching window coverings, such as heavy drapes and blinds with small slats that are hard to clean, are notorious breeding grounds for dust mites. Better choices include window shades and blinds or shutters with large slats that can be easily vacuumed. Clean blinds, shutters and shades weekly with a vacuum that features a high-efficiency particulate air (HEPA) filter, and damp clean them once every three to six months.
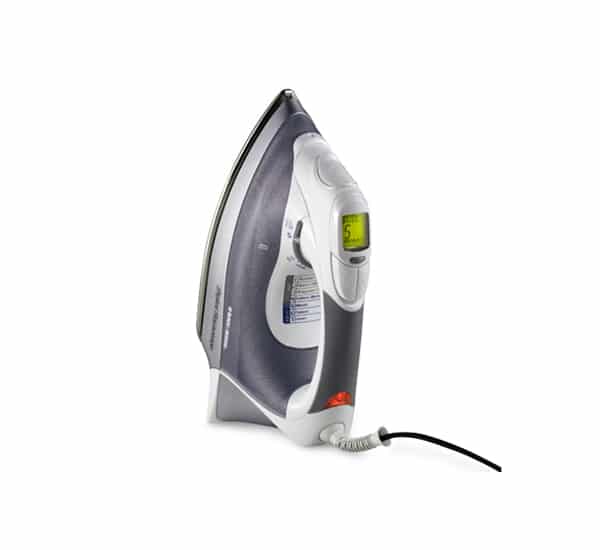
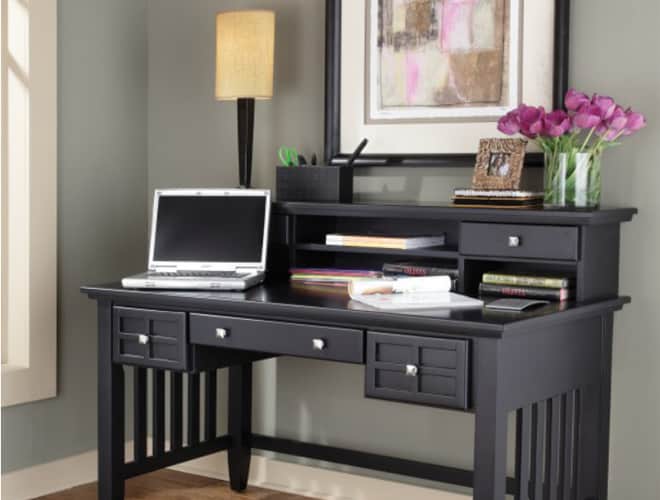
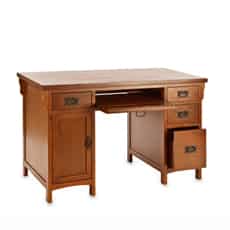 As your central locus of work, your choice of desk is important to providing you with adequate storage and keeping you organized.
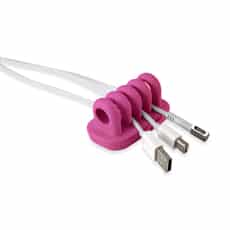 Electronic equipment such as computers, scanners, printers and cell-phone chargers bring what can seem like an overabundance of cords and cables. A variety of cord control products on the market allow you to collect the cords and store them in an unobtrusive manner. Such systems also allow you to easily unplug items without having to sort through all of your cords and cables.
 If you have a lot of items and limited drawer or cabinet space, storage bins work well for organizing. There are storage bins in various shapes and sizes, making it possible to find the right size and shape for your situation. You can save space by opting for stackable storage bins and units. Keep these storage and organization tools close at hand, and you can enjoy a well-run home office that rivals any business.


 Toddlers are becoming more aware of their surroundings, and they’ll enjoy exploring and playing at bath time with your help. Many infant baths convert for toddlers, allowing your little one to sit up when he’s ready. When it’s time to move into the big bathtub, make sure he or she stays secure and happy by using a non-slip bathmat in the tub.